
In this post we will see how we can create Angular JS dynamics tabs in MVC application. As you all are aware of that we have a tab control in Angular JS, here we are going to see how those tabs can be created dynamically with some dynamic data, these dynamic data can be fetched from database. Here I am creating some dynamic data accordingly for making this article easy to understand. We will be creating Angular JS app, controller, service to fetch the data from our MVC controller. Once that is done, we will format the data and assign it to the tab control. Sounds good?. I hope you will like this article.
Download Source Code
Download the source code from here: Dynamic Angular JS Tabs In MVC
Background
Recently I have got a requirement to create a tab control in one of my Angular JS application. Then I thought of creating the same dynamically according to the user needs. This article is a demo of the same.
Using the code
First, we will start with creating an MVC application. Open your visual studio, then click File->New->Project. Name your project.
Now our application is launched, please go ahead and install Angular JS in your project from NuGet packages. You can see some new CSS files and scripts has been added to our project. So the set up has been done. Now what we need to do is to move on the coding part.
Create a controller
Now we can create a new controller, in my case I created a controller ‘HomeController’. In my controller I am going to call a model action which will return some dynamic data. See the code below.
[csharp]
public class HomeController : Controller
{
//
// GET: /Home/
public ActionResult Index()
{
return View();
}
public JsonResult TabData()
{
Test t = new Test();
var myList = t.GetData();
return Json(myList, JsonRequestBehavior.AllowGet);
}
}
[/csharp]
Here we have one ActionResult and one JsonResult which we are going to call as Angular JS service. As you can see I am creating an instance of my model Test, now we will create our model class. Shall we?
Create Model
I have create a model class with the name Test. Here I am creating some data dynamically using a for loop and assign those values to a list. Please see the codes below.
[csharp]
namespace AsyncActions.Models
{
public class Test
{
public List<Customer> GetData()
{
try
{
List<Customer> cst = new List<Customer>();
for (int i = 0; i < 15; i++)
{
Customer c = new Customer();
c.CustomerID = i;
c.CustomerCode = "CST" + i;
cst.Add(c);
}
return cst;
}
catch (Exception)
{
throw new NotImplementedException();
}
}
}
public class Customer
{
public int CustomerID { get; set; }
public string CustomerCode { get; set; }
}
}
[/csharp]
As you can see I am creating a list of type Customer. Is that fine? Now what is pending? Yes, a view.
Create a view
Right click on your controller and click add view, that will give you a new view in your view folder. Hope you get that.
So our view is ready, now we can do some codes in our view to populate our tab. Are you ready?
[html]
<div ng-controller="tabController" class="sample tabsdemoDynamicTabs" layout="column" ng-cloak="" ng-app="tab">
<md-content class="md-padding">
<md-tabs md-selected="selectedIndex" md-border-bottom="" md-autoselect="">
<md-tab ng-repeat="tab in tabs" ng-disabled="tab.disabled" label="{{tab.title}}">
<div class="demo-tab tab{{$index}}" style="padding: 25px; text-align: center;">
<div ng-bind="tab.content"></div>
<br>
<md-button class="md-primary md-raised" ng-click="removeTab( tab )" ng-disabled="tabs.length <= 1">Remove Tab</md-button>
</div>
</md-tab>
</md-tabs>
</md-content>
<form ng-submit="addTab(tTitle,tContent)" layout="column" class="md-padding" style="padding-top: 0;">
<div layout="row" layout-sm="column">
<div flex="" style="position: relative;">
<h2 class="md-subhead" style="position: absolute; bottom: 0; left: 0; margin: 0; font-weight: 500; text-transform: uppercase; line-height: 35px; white-space: nowrap;">Add a new Tab:</h2>
</div>
<md-input-container>
<label for="label">Label</label>
<input type="text" id="label" ng-model="tTitle">
</md-input-container>
<md-input-container>
<label for="content">Content</label>
<input type="text" id="content" ng-model="tContent">
</md-input-container>
<md-button class="add-tab md-primary md-raised" ng-disabled="!tTitle || !tContent" type="submit" style="margin-right: 0;">Add Tab</md-button>
</div>
</form>
</div>
[/html]
As you can see we are declaring our angular js controller and app name as follows.
[html]
ng-controller="tabController" class="sample tabsdemoDynamicTabs" layout="column" ng-cloak="" ng-app="tab"
[/html]
Now we will add the needed reference to our view.
Add the style sheet references
[html]
<link href="~/CSS/angular-material.css" rel="stylesheet" />
<link href="~/CSS/docs.css" rel="stylesheet" />
[/html]
Add styles for tabs
[css]
<style>
.tabsdemoDynamicTabs md-content {
background-color: transparent !important;
}
.tabsdemoDynamicTabs md-content md-tabs {
border: 1px solid #e1e1e1;
}
.tabsdemoDynamicTabs md-content md-tabs md-tab-content {
background: #f6f6f6;
}
.tabsdemoDynamicTabs md-content md-tabs md-tabs-wrapper {
background: white;
}
.tabsdemoDynamicTabs md-content h1:first-child {
margin-top: 0;
}
.tabsdemoDynamicTabs md-input-container {
padding-bottom: 0;
}
.tabsdemoDynamicTabs .remove-tab {
margin-bottom: 40px;
}
.tabsdemoDynamicTabs .demo-tab > div > div {
padding: 25px;
box-sizing: border-box;
}
.tabsdemoDynamicTabs .edit-form input {
width: 100%;
}
.tabsdemoDynamicTabs md-tabs {
border-bottom: 1px solid rgba(0, 0, 0, 0.12);
}
.tabsdemoDynamicTabs md-tab[disabled] {
opacity: 0.5;
}
.tabsdemoDynamicTabs label {
text-align: left;
}
.tabsdemoDynamicTabs .long > input {
width: 264px;
}
.tabsdemoDynamicTabs .md-button.add-tab {
transform: translateY(5px);
}
</style>
[/css]
Add the JS references
[html]
<script src="~/Scripts/angular.min.js"></script>
<script src="~/Scripts/angular-animate.min.js"></script>
<script src="~/Scripts/angular-route.js"></script>
<script src="~/Scripts/angular-aria.min.js"></script>
<script src="~/Scripts/angular-messages.min.js"></script>
<script src="~/Scripts/svg-assets-cache.js"></script>
<script src="~/Scripts/angular-material.js"></script>
<script src="~/Scripts/Module.js"></script>
[/html]
Here Module.js is the file where we are creating our Angular JS controller, Service, App. So can we go ahead and create those?
Create an app, controller, service in Angular JS
To add an app, controller, servicer in Angular JS, you need to add the codes as below.
[js]
(function () {
‘use strict’;
var app;
(function () {
//create app
app = angular.module("tab", [‘ngMaterial’, ‘ngMessages’, ‘material.svgAssetsCache’]);
//create controller
app.controller(‘tabController’, function ($scope, tabService) {
var serv = tabService.getAll();
serv.then(function (d) {
tabController(d.data, $scope);
}, function (error) {
console.log(‘Something went wrong, please check after a while’);
})
});
//create service
app.service(‘tabService’, function ($http) {
this.getAll = function () {
return $http({
url: "/Home/TabData", //Here we are calling our controller JSON action
method: "GET"
});
};
});
})();
})();
[/js]
As you can see once we get the data from the Angular JS service (tabService) to the controller (tabController), we are passing the data to a function named tabController. Below is the code for that function.
[js]
function tabController(data, $scope) {
var tabsArray = [];
for (var i = 0; i < data.length; i++) {
tabsArray.push(
{
‘title’:"Customer ID: "+ data[i].CustomerID,
‘content’: data[i].CustomerCode + " The data you are seeing here is for the customer with the Custome rCode " + data[i].CustomerCode
});
}
var tabs = tabsArray,
selected = null,
previous = null;
$scope.tabs = tabs;
$scope.selectedIndex = 0;
$scope.$watch(‘selectedIndex’, function (current, old) {
previous = selected;
selected = tabs[current];
});
$scope.addTab = function (title, view) {
view = view || title + " Content View";
tabs.push({ title: title, content: view, disabled: false });
};
$scope.removeTab = function (tab) {
var index = tabs.indexOf(tab);
tabs.splice(index, 1);
};
}
[/js]
That’s all we have created the Angular JS tabs dynamically. Shall we see the output now?
Output
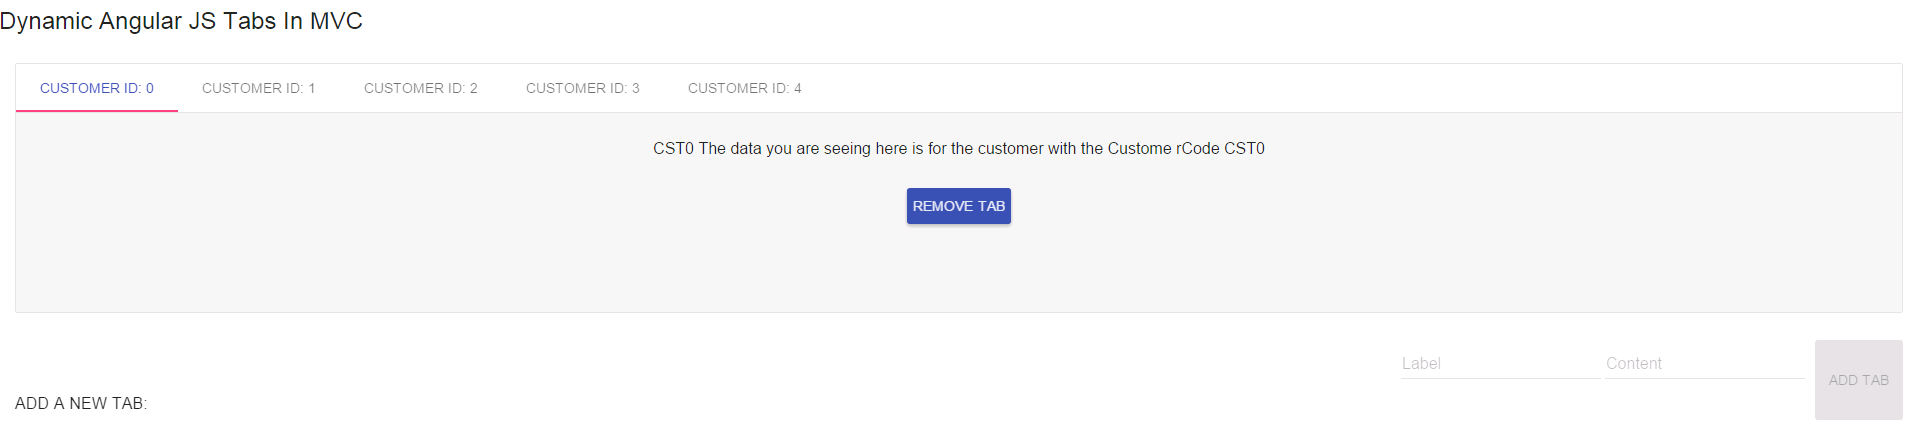
Dynamic Angular JS Tabs In MVC Figure 1

Dynamic Angular JS Tabs In MVC Figure 2
References
Conclusion
Did I miss anything that you may think which is needed? Could you find this post as useful? I hope you liked this article. Please share me your valuable suggestions and feedback.
Your turn. What do you think?
A blog isn’t a blog without comments, but do try to stay on topic. If you have a question unrelated to this post, you’re better off posting it on C# Corner, Code Project, Stack Overflow, Asp.Net Forum instead of commenting here. Tweet or email me a link to your question there and I’ll definitely try to help if I can.
Kindest Regards
Sibeesh Venu