
[toc]
Introduction
In this article, we will see how to export from an HTML table using jQuery. We all work in some applications where we are playing with data’s. It might be some data returned by the server or it might be some client-side data like HTML table. No matter whichever forms the data is, there will be an export option. Isn’t it? 80% of our clients need the data to be exported to excel. So we need to give the option to export the given data to excel, not dependent on the data format. In my case, my data is in the form of an HTML table, so in this post, we will explain how to export an HTML data to excel, pdf, png, jpeg etc. I hope you will like it.
Download Files here: HTML Table Export
Background
As I said earlier, this article explains how to export an HTML table using jQuery. In this article we will see how we can export the given data to the following formats:
- Excel
- Image
- CSV
- PPT
- Word
- TXT
- XML
You can always see other exporting related articles here.
Why
In my project, we are doing 80% of our work in the client side. So I decided to implement the export feature in the client side itself. The same can be done using server-side code also but I prefer the client-side one.
What you must know
Using the code
Before you start, you need to download the necessary files from TableExport.jquery.plugin.
Once you have download the files, you need to include those in your project. Here I am using a MVC4 web application.
[js]
<script src=“~/Contents/jquery-1.9.1.js”></script>
<script src=“~/Contents/tableExport.js”></script> @*Main file which does export feature *@
<script src=“~/Contents/jquery.base64.js”></script> @*Main file which does convert the content to base64 *@
<script src=“~/Contents/html2canvas.js”></script> @*Main file which does export to image feature *@
<script src=“~/Contents/jspdf/libs/base64.js”></script> @*Main file which does convert the content to base64 for pdf *@
<script src=“~/Contents/jspdf/libs/sprintf.js”></script> @*Main file which does export feature for pdf *@
<script src=“~/Contents/jspdf/jspdf.js”></script> @*Main file which does export feature for pdf *@
[/js]
Let’s say you have an HTML table as follows:
[html]
<table id=“activity” >
<thead>
<tr>
<th>Name</th>
<th>Activity on Code Project (%)</th>
<th>Activity on C# Corner (%)</th>
<th>Activity on Asp Forum (%)</th>
</tr>
</thead>
<tbody>
<tr>
<td>Sibeesh</td>
<td>100</td>
<td>98</td>
<td>80</td>
</tr>
<tr>
<td>Ajay</td>
<td>90</td>
<td>0</td>
<td>50</td>
</tr>
<tr>
<td>Ansary</td>
<td>100</td>
<td>20</td>
<td>10</td>
</tr>
<tr>
<td>Aghil</td>
<td>0</td>
<td>30</td>
<td>90</td>
</tr>
<tr>
<td>Arya</td>
<td>0</td>
<td>0</td>
<td>95</td>
</tr>
</tbody>
</table>
[/html]
Add some more UI elements for firing the click events.
[html]
<table>
<tr id=“footerExport”>
<td id=“exportexcel”><img src=“~/icons/xls.png” title=“Export to Excel” /></td>
<td id=“exportpdf”><img src=“~/icons/pdf.png” title=“Export to PDF” /></td>
<td id=“exportimage”><img src=“~/icons/png.png” title=“Export to PNG” /></td>
<td id=“exportcsv”><img src=“~/icons/csv.png” title=“Export to CSV” /></td>
<td id=“exportword”><img src=“~/icons/word.png” title=“Export to Word” /></td>
<td id=“exporttxt”><img src=“~/icons/txt.png” title=“Export to TXT” /></td>
<td id=“exportxml”><img src=“~/icons/xml.png” title=“Export to XML” /></td>
<td id=“exportppt”><img src=“~/icons/ppt.png” title=“Export to PPT” /></td>
</tr>
</table>
[/html]
Add a few styles to the table to make it viewable.
[css]
<style>
#activity {
text-align:center;border:1px solid #ccc;
}
#activity td{
text-align:center;border:1px solid #ccc;
}
#footerExport td{
cursor:pointer;
text-align:center;border:1px solid #ccc;
border:none;
}
</style>
[/css]
Now it is time to fire our events 🙂 You can do that as in the following.
[js]
<script>
$(document).ready(function () {
$(‘#exportexcel’).bind(‘click’, function (e) {
$(‘#activity’).tableExport({ type: ‘excel’, escape: ‘false’ });
});
$(‘#exportpdf’).bind(‘click’, function (e) {
$(‘#activity’).tableExport({ type: ‘pdf’, escape: ‘false’ });
});
$(‘#exportimage’).bind(‘click’, function (e) {
$(‘#activity’).tableExport({ type: ‘png’, escape: ‘false’ });
});
$(‘#exportcsv’).bind(‘click’, function (e) {
$(‘#activity’).tableExport({ type: ‘csv’, escape: ‘false’ });
});
$(‘#exportppt’).bind(‘click’, function (e) {
$(‘#activity’).tableExport({ type: ‘powerpoint’, escape: ‘false’ });
});
$(‘#exportxml’).bind(‘click’, function (e) {
$(‘#activity’).tableExport({ type: ‘xml’, escape: ‘false’ });
});
$(‘#exportword’).bind(‘click’, function (e) {
$(‘#activity’).tableExport({ type: ‘doc’, escape: ‘false’ });
});
$(‘#exporttxt’).bind(‘click’, function (e) {
$(‘#activity’).tableExport({ type: ‘txt’, escape: ‘false’ });
});
});
</script>
[/js]
Please note that you can export to a few more formats in the same way. You can learn more here:tableExport.jquery.plugin.
Explanation
Now its time go deeper into that plugin. In the downloaded files you can see a file called tableExport.js. just open that file, you can see some conditions for specific formats. And the default property for exporting as follows.
[js]
var defaults = {
separator: ‘,’,
ignoreColumn: [],
tableName:‘yourTableName’,
type:‘csv’,
pdfFontSize:7,
pdfLeftMargin:20,
escape:‘true’,
htmlContent:‘false’,
consoleLog:‘false’
};
[/js]
You can change these properties depending on your needs as follows.
[js]
var varpdfFontSize= ‘7’;
$(‘#activity’).tableExport({ type: ‘excel’, escape: ‘false’,pdfFontSize:varpdfFontSize});
[/js]
You can try all the properties listed above like this :).
Now in that file you can see an if else if condition that is satisfied for multiple formats. Let me explain for Excel formatting alone.
[js]
var excel=“<table>”;
// Header
$(el).find(‘thead’).find(‘tr’).each(function() {
excel += “<tr>”;
$(this).filter(‘:visible’).find(‘th’).each(function(index,data) {
if ($(this).css(‘display’) != ‘none’){
if(defaults.ignoreColumn.indexOf(index) == -1){
excel += “<td>” + parseString($(this))+ “</td>”;
}
}
});
excel += ‘</tr>’;
});
// Row Vs Column
var rowCount=1;
$(el).find(‘tbody’).find(‘tr’).each(function() {
excel += “<tr>”;
var colCount=0;
$(this).filter(‘:visible’).find(‘td’).each(function(index,data) {
if ($(this).css(‘display’) != ‘none’){
if(defaults.ignoreColumn.indexOf(index) == -1){
excel += “<td>”+parseString($(this))+“</td>”;
}
}
colCount++;
});
rowCount++;
excel += ‘</tr>’;
});
excel += ‘</table>’
if(defaults.consoleLog == ‘true’){
console.log(excel);
}
var excelFile = “<html xmlns:o=’urn:schemas-microsoft-com:office:office’ xmlns:x=’urn:schemas-microsoft-com:office:”+defaults.type+“‘ xmlns=’http://www.w3.org/TR/REC-html40′>”;
excelFile += “<head>”;
excelFile += “<!–[if gte mso 9]>”;
excelFile += “<xml>”;
excelFile += “<x:ExcelWorkbook>”;
excelFile += “<x:ExcelWorksheets>”;
excelFile += “<x:ExcelWorksheet>”;
excelFile += “<x:Name>”;
excelFile += “{worksheet}”;
excelFile += “</x:Name>”;
excelFile += “<x:WorksheetOptions>”;
excelFile += “<x:DisplayGridlines/>”;
excelFile += “</x:WorksheetOptions>”;
excelFile += “</x:ExcelWorksheet>”;
excelFile += “</x:ExcelWorksheets>”;
excelFile += “</x:ExcelWorkbook>”;
excelFile += “</xml>”;
excelFile += “<![endif]–>”;
excelFile += “</head>”;
excelFile += “<body>”;
excelFile += excel;
excelFile += “</body>”;
excelFile += “</html>”;
var base64data = “base64,” + $.base64.encode(excelFile);
window.open(‘data:application/vnd.ms-‘+defaults.type+‘;filename=exportData.doc;’ + base64data);
[/js]
Procedure
- Find the UI element (in this case it is our HTML table).
- Loop through the rows of the thread for the header information.
- Apply a filter to avoid the UI elements that have a display as none (filter(‘:visible’)).
- If the UI is visible, append it to the variable (excel += “” + parseString($(this))+ “”;)
- The same procedure is done for the row vs column values also. The only difference is, here we are looping through the tbody instead of thread.
- After the data is manipulated, data is formulated in the Excel format.
You can learn more in the attachment.
Output
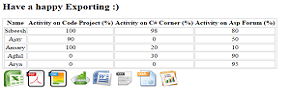
Export From HTML Table
Points of Interest
jquery, CSS, HTML, Export
History
1st version: 18-11-2014
2nd Version: 24-11-2014
Changes did
- Added Images to UI elements
- Added some export feature
Conclusion
Did I miss anything that you may think which is needed? Could you find this post as useful? I hope you liked this article. Please share me your valuable suggestions and feedback.
Your turn. What do you think?
A blog isn’t a blog without comments, but do try to stay on topic. If you have a question unrelated to this post, you’re better off posting it on C# Corner, Code Project, Stack Overflow, Asp.Net Forum instead of commenting here. Tweet or email me a link to your question there and I’ll definitely try to help if I can.
Kindest Regards
Sibeesh Venu