
[toc]
Introduction
This post is a continuation of the course Developing an Angular 5 App series if you haven’t gone through the previous posts yet, I strongly recommend you to do that. You can find the links to the previous posts below. In this post, we are going to implement Guard, which help us to restrict users to access some pages if they haven’t logged in to our application, in Angular 5. So at the end of this article, you will get to know how you can handle unauthorized route accesses. I hope you will like this article.
Developing an Angular 5 App series
These are the previous posts in this series. Please go ahead and have a look.
- What Is New and How to Set Up our First Angular 5 Application
- Angular 5 Basic Demo Project Overview
- Generating Your First Components And Modules in Angular 5 App
- Implement Validations in Angular 5 App
- Implementing Guard in Angular 5 App
Source Code
You can always clone or download the source code here
Background
We may be having many numbers of pages on our app, some may be used by logged in users, and some can be used by unauthorized users. But if you are letting all the users use all the pages, no matter whether they have logged in or not? Yeah, obviously that’s not a perfect application. In our application, we are going to make our homepage available only for a logged in user. To do this, we can use Guard.
Using the code
Let’s go ahead and write some codes now.
Generate Guard
As we are using Angular CLI, we can easily generate Auth Guard on our application. Do you remember that we have created some components in our previous article? We can always create a Guard in the same way.
PS F:\Visual Studio\ng5> ng generate guard auth
In the above step, we are generating guard on our root level. Once you run the above command, this will generate two new Typescript files as follows.
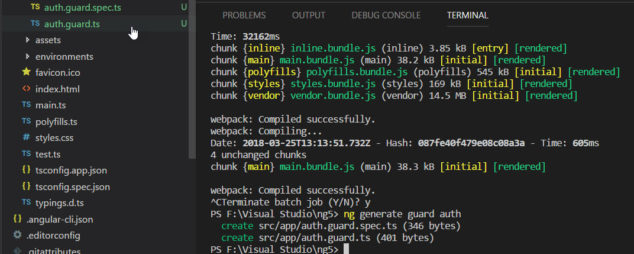
Let’s go to those two files now.
auth.guard.ts
import { Injectable } from '@angular/core';
import { CanActivate, ActivatedRouteSnapshot, RouterStateSnapshot } from '@angular/router';
import { Observable } from 'rxjs/Observable';

@Injectable()
export class AuthGuard implements CanActivate {
  canActivate(
    next: ActivatedRouteSnapshot,
    state: RouterStateSnapshot): Observable<boolean> | Promise<boolean> | boolean {
    return true;
  }
}
auth.guard.spec.ts
import { TestBed, async, inject } from '@angular/core/testing';

import { AuthGuard } from './auth.guard';

describe('AuthGuard', () => {
  beforeEach(() => {
    TestBed.configureTestingModule({
      providers: [AuthGuard]
    });
  });

  it('should ...', inject([AuthGuard], (guard: AuthGuard) => {
    expect(guard).toBeTruthy();
  }));
});
This is just a test file, we can see how to perform tests on the Angular app in another article. Let’s concentrate on the implementation for now.
Generate login component and set up
Now that we have Guard ready for modification before we do that, let’s create a component for login.
PS F:\Visual Studio\ng5> ng g c login
  create src/app/login/login.component.html (24 bytes)
  create src/app/login/login.component.spec.ts (621 bytes)
  create src/app/login/login.component.ts (265 bytes)
  create src/app/login/login.component.css (0 bytes)
  update src/app/app.module.ts (1331 bytes)
PS F:\Visual Studio\ng5>
Now it is time to edit our routes in app.module.ts with the new route for login. Please be noted that it is not a recommended way to create routes in app.module.ts file. We should create a separate routing module for the same and use it in app.module.ts. I will be sharing how to do that in another article.
import { LoginComponent } from './login/login.component';

const myRoots: Routes = [
  { path: '', component: HomeComponent, pathMatch: 'full' },
  { path: 'register', component: RegistrationComponent },
  { path: 'login', component: LoginComponent},
  { path: 'home', component: HomeComponent}]

@NgModule({
  declarations: [
    AppComponent,
    HomeComponent,
    NavComponent,
    RegistrationComponent,
    LoginComponent
  ],
  imports: [
    BrowserModule, BrowserAnimationsModule, FormsModule, ReactiveFormsModule,
    MatButtonModule, MatCardModule, MatInputModule, MatSnackBarModule, MatToolbarModule,
    RouterModule.forRoot(myRoots)
  ],
  providers: [],
  bootstrap: [AppComponent]
})
We may also need to edit the nav.component.html by adding a new button for login.
<mat-toolbar color="primary">
  <button mat-button routerLink="/">Home</button>
  <button mat-button routerLink="/register">Register</button>
  <button mat-button routerLink="/login">Login</button>
</mat-toolbar>
Now, go to your login.component.html file and add the following markup.
<mat-card>
  <form [formGroup]="form" (ngSubmit)="login()">
    <mat-input-container>
      <input matInput type="email" placeholder="Email" formControlName="email" />
    </mat-input-container>
    <mat-input-container>
      <input matInput type="password" placeholder="Password" formControlName="password" />
    </mat-input-container>
    <button mat-raised-button type="submit" color="primary">Login</button>
  </form>
</mat-card>
As you can see, we are actually calling a login method on submit. Before we implement that function now on login.component.ts file let’s create an auth service and edit as preceding.
import { Injectable } from '@angular/core';
import { Router } from '@angular/router';

@Injectable()
export class AuthService {

  constructor(private myRoute: Router) { }

  sendToken(token: string) {
    localStorage.setItem("LoggedInUser", token)
  }

  getToken() {
    return localStorage.getItem("LoggedInUser")
  }

  isLoggednIn() {
    return this.getToken() !== null;
  }

  logout() {
    localStorage.removeItem("LoggedInUser");
    this.myRoute.navigate(["login"]);
  }


}
Now it is time to edit our login.component.ts file.
import { Component, OnInit } from '@angular/core';
import { FormBuilder, Validators } from '@angular/forms';
import { Router } from '@angular/router';
import { AuthService } from '../auth.service';

@Component({
  selector: 'app-login',
  templateUrl: './login.component.html',
  styleUrls: ['./login.component.css']
})
export class LoginComponent implements OnInit {

  form;
  constructor(private fb: FormBuilder,
    private myRoute: Router,
    private auth: AuthService) {
    this.form = fb.group({
      email: ['', [Validators.required, Validators.email]],
      password: ['', Validators.required]
    });
  }

  ngOnInit() {
  }

  login() {
    if (this.form.valid) {
      this.auth.sendToken(this.form.value.email)
      this.myRoute.navigate(["home"]);
    }
  }

}
This is not the preferred way of doing this, instead, you should create an API service and connect to a database. And then, check whether this email and password are valid or not, at last, you should set the localStorage with the token you get from server API. This topic is enough for another article, to make this article short, I am just setting the value email here.
If you are getting an error as “ERROR Error: Uncaught (in promise): EmptyError: no elements in sequence”, please make sure that you have rxjs version greater than or equal to 5.5.4 in package.json file. The rxjs version 5.5.3 has this issue with Angular 5.
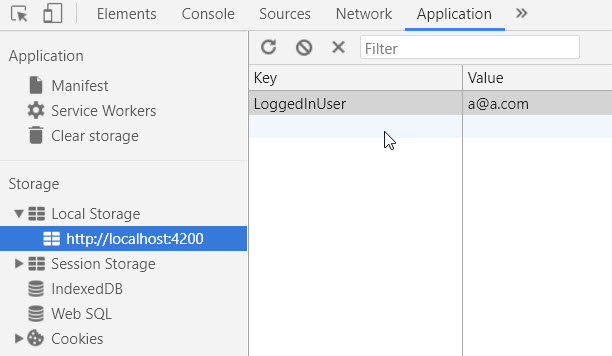
Now run your application and make sure that it is redirecting to the homepage. you can also check the localStorage entry on your browser console.
Set up Guard generated
Let’s go to our auth.guard.ts file and make some changes.
import { Injectable } from '@angular/core';
import { CanActivate, ActivatedRouteSnapshot, RouterStateSnapshot } from '@angular/router';
import { Observable } from 'rxjs/Observable';
import { AuthService } from './auth.service';
import {Router} from '@angular/router';

@Injectable()
export class AuthGuard implements CanActivate {
  constructor(private auth: AuthService,
    private myRoute: Router){

  }

  canActivate(
    next: ActivatedRouteSnapshot,
    state: RouterStateSnapshot): Observable<boolean> | Promise<boolean> | boolean {
    if(this.auth.isLoggednIn()){
      return true;
    }else{
      this.myRoute.navigate(["login"]);
      return false;
    }
  }
}
Do not forget to add AuthService and AuthGuard in providers in app.module.ts.
import { AuthService } from './auth.service';
import { AuthGuard } from './auth.guard';
Use Auth Guard in Routes
Wow, the set up is done, now it is time for action. Let’s go to our routes now and change the code as preceding.
const myRoots: Routes = [
  { path: '', component: HomeComponent, pathMatch: 'full' , canActivate: [AuthGuard]},
  { path: 'register', component: RegistrationComponent },
  { path: 'login', component: LoginComponent},
  { path: 'home', component: HomeComponent, canActivate: [AuthGuard]}
];
Run your application and try to access the home page before login if everything goes fine, it should redirect you to login page.

Let’s do some more coding on the nav.component.html and nav.component.ts for making our app more meaningful.
nav.component.ts
import { Component, OnInit } from '@angular/core';
import { AuthService } from '../auth.service';

@Component({
  selector: 'app-nav',
  templateUrl: './nav.component.html',
  styleUrls: ['./nav.component.css']
})
export class NavComponent implements OnInit {

  constructor(private auth: AuthService) { }

  ngOnInit() {
  }

}
nav.component.html
<mat-toolbar color="primary">
  <button mat-button routerLink="/home">Home</button>
  <button mat-button *ngIf="!auth.isLoggednIn()" routerLink="/register">Register</button>
  <button mat-button *ngIf="!auth.isLoggednIn()" routerLink="/login">Login</button>
  <button mat-button *ngIf="auth.isLoggednIn()" (click)="auth.logout()">Logout</button>
</mat-toolbar>
Here we are just making the log out button available only for logged in users and hiding register and login button for logged in user. Sounds good? The auth.isLoggedIn function will be available on this page as we are injecting the auth service on out nav.component.ts file.
Conclusion
Thanks a lot for reading. Did I miss anything that you may think which is needed? Could you find this post as useful? I hope you liked this article. Please share me your valuable suggestions and feedback.
Your turn. What do you think?
A blog isn’t a blog without comments, but do try to stay on topic. If you have a question unrelated to this post, you’re better off posting it on C# Corner, Code Project, Stack Overflow, Asp.Net Forum instead of commenting here. Tweet or email me a link to your question there and I’ll definitely try to help if I can.
Kindest Regards
Sibeesh Venu