
Here we are going to see how we can implement some basic validations using Knockout JS. As we mentioned in the headline, we are going to create validation demo in two manner.
If you are totally new to Knockout JS, I stringly recommend you to read my previous post here, where I have shared some basics of Knockout JS. We will be using Visual Studio for our development. I hope you will like this. Now let’s begin.
Download source code
Background
As I have been working in a project where we use Knockout JS, it was my duty to do some validation for an existing page. This article shows the ways I have tried to implement the same. Like I said above, using a plugin and without using a plugin. Now let’s go and implement the same in your application too. Shall we?
Create a HTML page
To work with Knockout JS, we need a page right. Let’s create it first. Before we do that, please do not forget to install Knockout JS and jQuery from NuGet.
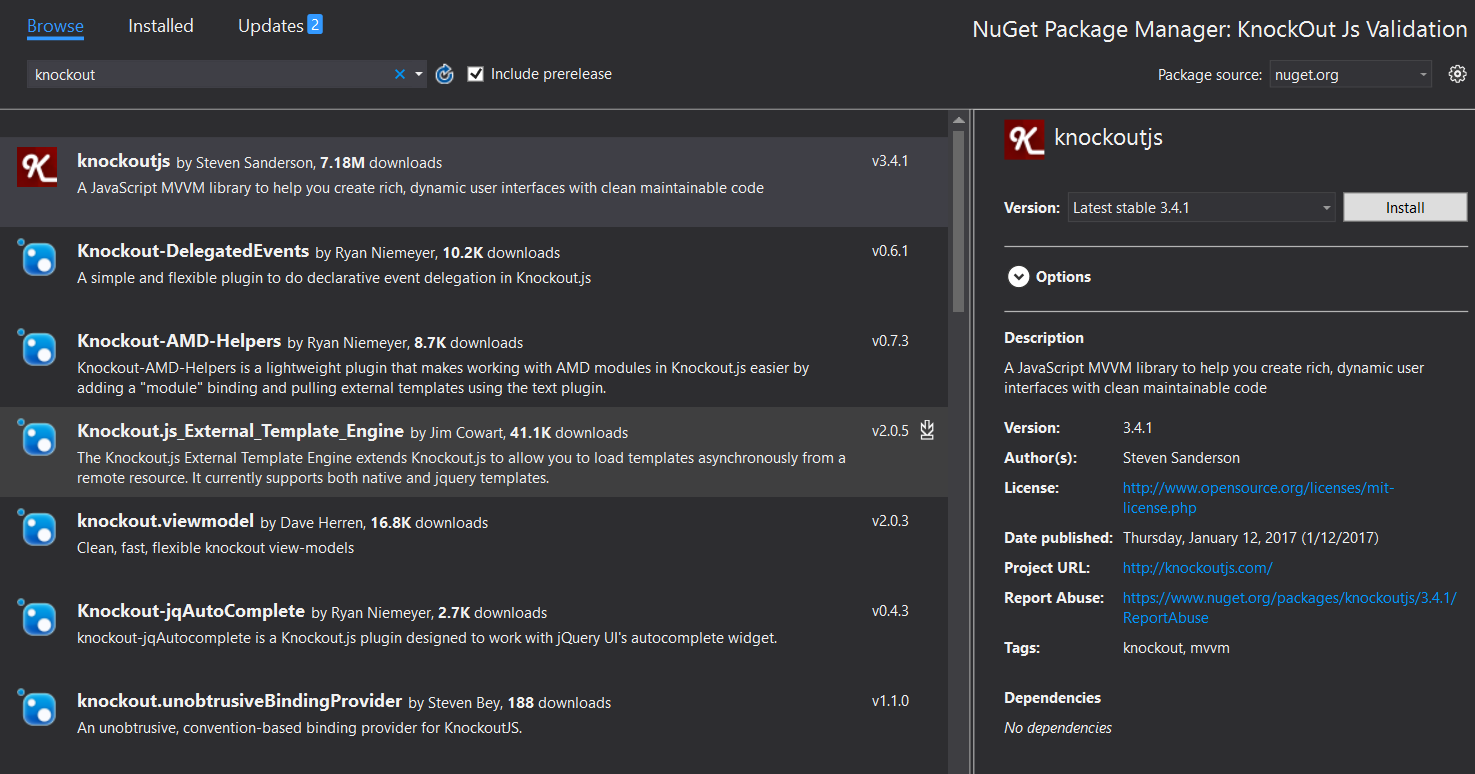
Installing_KnockOut_JS_from_NuGet
[html]
<!DOCTYPE html>
<html>
<head>
<title></title>
<meta charset="utf-8" />
</head>
<body>
</body>
</html>
[/html]
Now create a JS file and include it in your page.
[js]
<script src="Validations-Without-Plugin.js"></script>
[/js]
Let’s begin our tutorial – Knockout JS validation without using a plugin
Open your JS file (Validations-Without-Plugin.js), this is where we are going to write our scripts. As a first step, we need to create our view model and bind it using applyBindings function. Am I right?
[js]
$(function () {
function myViewModel(firstName, lastName, email) {
this.txtFirstName = ko.observable(firstName);
this.txtLastName = ko.observable(lastName);
this.txtEmail = ko.observable(email);
};
ko.applyBindings(new myViewModel("Sibeesh", "Venu", "sibikv4u@gmail.com"));
});
[/js]
Now let create our view.
[html]
<!DOCTYPE html>
<html>
<head>
<title>KnockOut JS Validations</title>
<meta charset="utf-8" />
<script src="Scripts/jquery-3.1.1.min.js"></script>
<script src="Scripts/knockout-3.4.1.js"></script>
<script src="Scripts/Validations-Without-Plugin.js"></script>
</head>
<body>
<table>
<caption>Knockout JS Validation</caption>
<tr>
<td>
First Name: <input type="text" id="txtFirstName" name="txtFirstName" data-bind=’value: txtFirstName’ />
</td>
</tr>
<tr>
<td>
Last Name: <input type="text" id="txtLastName" name="txtLastName" data-bind=’value: txtLastName’ />
</td>
</tr>
<tr>
<td>
Email: <input type="text" id="txtEmail" name="txtEmail" data-bind=’value: txtEmail’ />
</td>
</tr>
<tr>
<td>
<input type="button" value="Submit" />
</td>
</tr>
</table>
</body>
</html>
[/html]
If you run your page, you can see the view has got updated with the values we have given in our view model (Do you remember the use if observable()?)
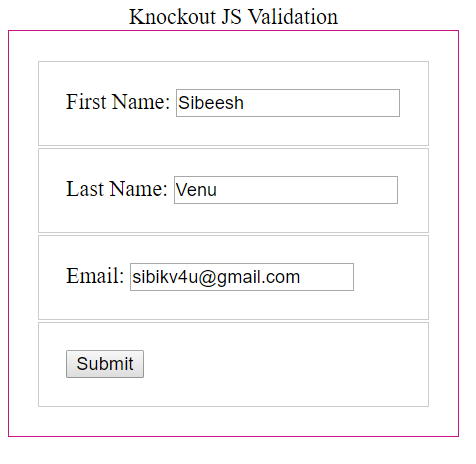
Knockout_JS_Observables_Updated
So far everything is good, now it is time to update our view model and create some extenders.
Knockout JS extenders are the easy way to give some additional functionalities to your observables. It can be anything, in this case we are going to create some validations for our observables or our controls.
We can create the extenders and update the view as preceding.
[js]
$(function () {
ko.extenders.isRequired = function (elm, customMessage) {
//add some sub-observables to our observable
elm.hasError = ko.observable();
elm.message = ko.observable();
//This is the function to validate the value entered in the text boxes
function validateValueEntered(valEntered) {
elm.hasError(valEntered ? false : true);
//If the custom message is not given, the default one is taken
elm.message(valEntered ? "" : customMessage || "I am required 🙁 ");
}
//Call the validation function for the initial validation
validateValueEntered(elm());
//Validate the value whenever there is a change in value
elm.subscribe(validateValueEntered);
return elm;
};
ko.extenders.isEmail = function (elm, customMessage) {
//add some sub-observables to our observable
elm.hasError = ko.observable();
elm.message = ko.observable();
//This is the function to validate the value entered in the text boxes
function validateEmail(valEntered) {
var emailPattern = /^(([^<>()\[\]\\.,;:\s@"]+(\.[^<>()\[\]\\.,;:\s@"]+)*)|(".+"))@((\[[0-9]{1,3}\.[0-9]{1,3}\.[0-9]{1,3}\.[0-9]{1,3}])|(([a-zA-Z\-0-9]+\.)+[a-zA-Z]{2,}))$/;
//If the value entered is a valid mail id, return fals or return true
elm.hasError((emailPattern.test(valEntered) === false) ? true : false);
//If not a valid mail id, return custom message
elm.message((emailPattern.test(valEntered) === true) ? "" : customMessage);
}
//Call the validation function for the initial validation
validateEmail(elm());
//Validate the value whenever there is a change in value
elm.subscribe(validateEmail);
return elm;
};
function myViewModel(firstName, lastName, email) {
this.txtFirstName = ko.observable(firstName).extend({ isRequired: "You missed First Name" });
this.txtLastName = ko.observable(lastName).extend({ isRequired: "" });
this.txtEmail = ko.observable(email).extend({ isEmail: "Not a valid mail id" });
};
ko.applyBindings(new myViewModel("Sibeesh", "Venu", "sibikv4u@gmail.com"));
});
[/js]
Here .extend({ isRequired: “You missed First Name” }); is used for calling the extenders we are just created. The first parameter is the extender name you are creating, and the second one is just a custom message. I had explained the codes with comments, if you get any issues or doubt, please feel free to ask your queries. Now it is time to update our view.
[html]
<!DOCTYPE html>
<html>
<head>
<title>KnockOut JS Validations</title>
<meta charset="utf-8" />
<script src="Scripts/jquery-3.1.1.min.js"></script>
<script src="Scripts/knockout-3.4.1.js"></script>
<script src="Scripts/Validations-Without-Plugin.js"></script>
<style>
.error {
color: #D8000C;
background-color: #FFBABA;
font-family: cursive;
}
table {
border: 1px solid #c71585;
padding: 20px;
}
td {
border: 1px solid #ccc;
padding: 20px;
}
</style>
</head>
<body>
<table>
<caption>Knockout JS Validation</caption>
<tr>
<td>
First Name: <input type="text" id="txtFirstName" name="txtFirstName" data-bind=’value: txtFirstName, valueUpdate: "afterkeydown"’ />
<span class="error" data-bind=’visible: txtFirstName.hasError, text: txtFirstName.message’></span>
</td>
</tr>
<tr>
<td>
Last Name: <input type="text" id="txtLastName" name="txtLastName" data-bind=’value: txtLastName, valueUpdate: "afterkeydown"’ />
<span class="error" data-bind=’visible: txtLastName.hasError, text: txtLastName.message’></span>
</td>
</tr>
<tr>
<td>
Email: <input type="text" id="txtEmail" name="txtEmail" data-bind=’value: txtEmail, valueUpdate: "afterkeydown"’ />
<span class="error" data-bind=’visible: txtEmail.hasError, text: txtEmail.message’></span>
</td>
</tr>
<tr>
<td>
<input type="button" value="Submit" />
</td>
</tr>
</table>
</body>
</html>
[/html]
Every observables will be having their own hasError and message properties. And have you noticed that we are usig valueUpdate: “afterkeydown” in each data-bind event of our control. This is for initiating validation. Now let’s run our application and see whether it is working fine or not.

Knockout JS validation without a plugin demo
Knockout JS validation using a plugin – easy way
As we are going to use a plugn, we need to install it from the NuGet first. You can always get the plugin from here
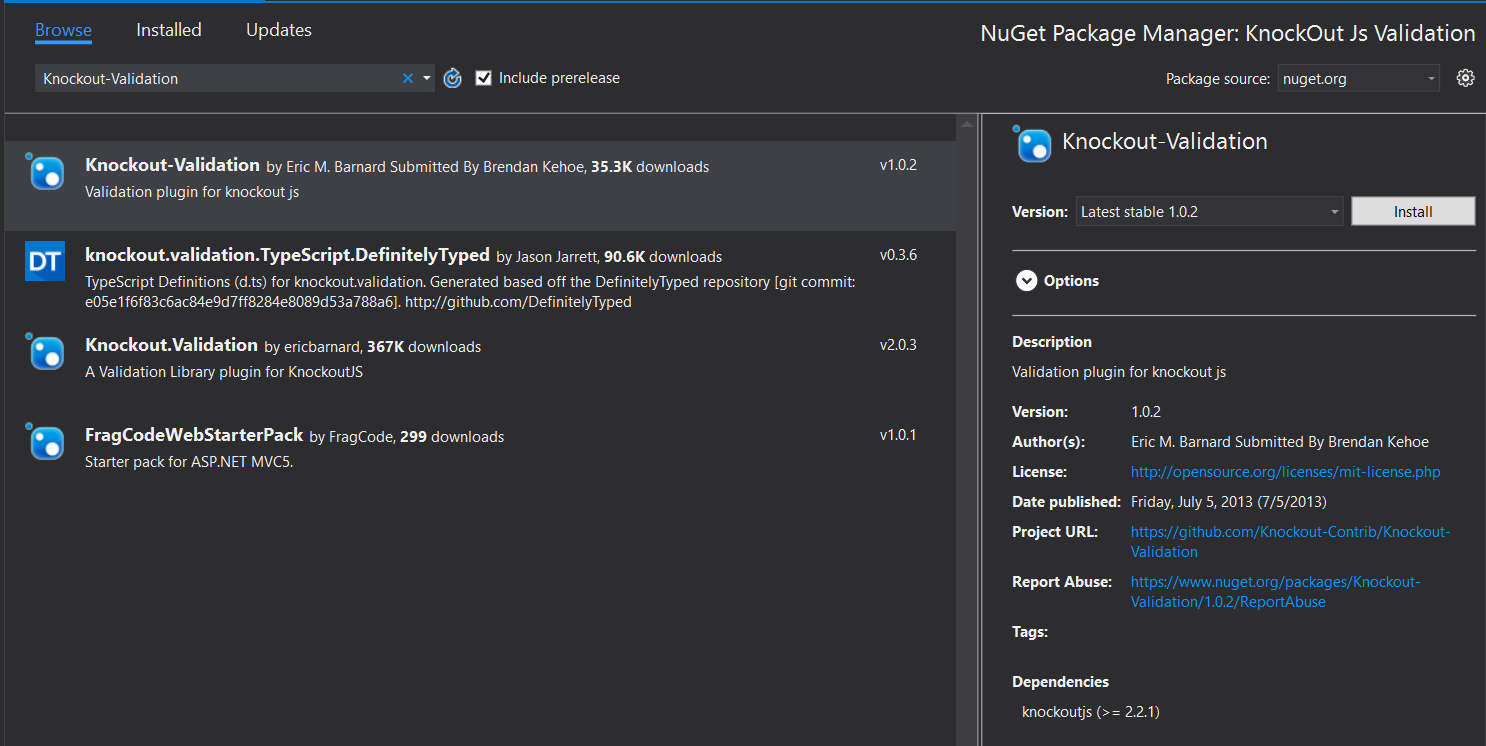
Knockout_Validation_JS_from_NuGet
Can we create our view model now?
[js]
$(function () {
function myViewModel(firstName, lastName, email) {
this.txtFirstName = ko.observable(firstName).extend({ required: true });
this.txtLastName = ko.observable(lastName).extend({ required: false });
this.txtEmail = ko.observable(email).extend({ email: true });
};
ko.applyBindings(new myViewModel("Sibeesh", "Venu", "sibikv4u@gmail.com"));
});
[/js]
You can see that, there is only few lines of codes when it compared to the old one we created. Now we can create our view.
[html]
<!DOCTYPE html>
<html>
<head>
<title>KnockOut JS Validations</title>
<meta charset="utf-8" />
<script src="Scripts/jquery-3.1.1.min.js"></script>
<script src="Scripts/knockout-3.4.1.js"></script>
<script src="Scripts/knockout.validation.js"></script>
<script src="Scripts/Validations-Plugin.js"></script>
<style>
table {
border: 1px solid #c71585;
padding: 20px;
}
td {
border: 1px solid #ccc;
padding: 20px;
}
</style>
</head>
<body>
<table>
<caption>Knockout JS Validation</caption>
<tr>
<td>
First Name: <input type="text" id="txtFirstName" name="txtFirstName" data-bind=’value: txtFirstName’ />
</td>
</tr>
<tr>
<td>
Last Name: <input type="text" id="txtLastName" name="txtLastName" data-bind=’value: txtLastName’ />
</td>
</tr>
<tr>
<td>
Email: <input type="text" id="txtEmail" name="txtEmail" data-bind=’value: txtEmail’ />
</td>
</tr>
<tr>
<td>
<input type="button" value="Submit" />
</td>
</tr>
</table>
</body>
</html>
[/html]
Please don’t forget to include the knockout.validation.js in your page. If everything is ready, run your application and see the output.

Knockout JS validation with plugin demo
That’s all for today. You can always download the source code attached to see the complete code and application. Happy coding!.
References
See also
Conclusion
Did I miss anything that you may think which is needed? Could you find this post as useful? I hope you liked this article. Please share me your valuable suggestions and feedback.
Your turn. What do you think?
A blog isn’t a blog without comments, but do try to stay on topic. If you have a question unrelated to this post, you’re better off posting it on C# Corner, Code Project, Stack Overflow, Asp.Net Forum instead of commenting here. Tweet or email me a link to your question there and I’ll definitely try to help if I can.
Kindest Regards
Sibeesh Venu