
[toc]
Introduction
I have got my MXChip a few days ago, and I have been playing with the same. Here in this article, we will see how we can set up our MXChip and get it working to send Temperature, Humidity, Pressure etc information to our Azure IoT Hub. Once we have received the data in our Azure IoT Hub we can do anything with that, I have already written some articles on the same topic, you can read them here. Let’s configure our IoT device now.
Background
The MXChip is a microcontroller with a bunch of sensors in it, the main advantage of this device is it is connected to Azure, which made the device to cloud and cloud to device transmission easier than ever. Here in this article, we will configure this device with the help of a tool/extension called Azure IoT Workbench in Visual Studio code. Once we are done configuring, we can change the CPP code to send the pressure information from the pressure sensor to the Azure IoT Hub.
Source Code
Please feel free to play with this repository here.
Set Up the System
Before we get started developing our device application/code, we need to set our environment first. So, please make sure that you are following this article and configure your Getting started .
Using the Code
Once you are able to see the D2C (Device to Cloud) and C2D (Cloud to Device) data, we are good to go and write some code to get the Pressure information from the Pressure Sensor (LPS22HB).
If you open the Device code, from the Getting started tutorial, which got generated using the Azure IoT Workbench tool. You can see the files as below.

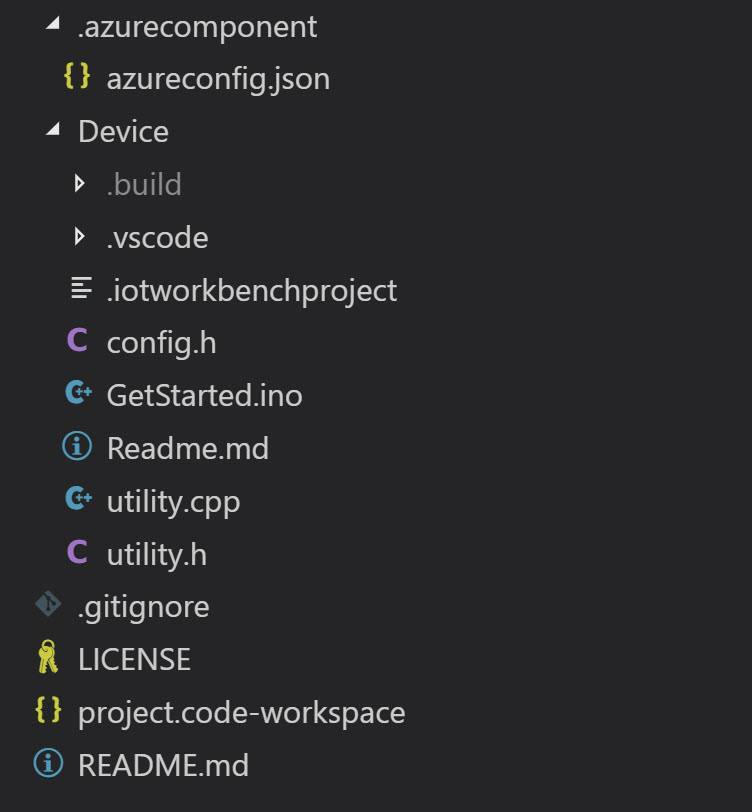
Here, the file azureconfig.json has the connection string information to your IoT Hub, Event Hub.
{
    "componentConfigs": [
        {
            "id": "e8d86334-156d-e40b-9618-a6a54bb94b25",
            "folder": "",
            "name": "",
            "dependencies": [],
            "type": "IoTHub",
            "componentInfo": {
                "values": {
                    "iotHubConnectionString": "",
                    "eventHubConnectionString": "",
                    "eventHubConnectionPath": ""
                }
            }
        }
    ]
}
The file project.code-workspace will have your Device code settings, including the Device path. Usually you wouldn’t need to check these files, as these values are automatically created when you are doing the provisioning as mentioned in the Get started tutorial.
The folder Device will have your Arduino code, here we are writing the codes in CPP (C++). If you open the solution in Visual Studio code, it will ask you open the work space, which is nothing but our Device code. Just click on Open Workspace, then we can start coding.
The Config.h file is our configuration file.
#define INTERVAL 2000

#define MESSAGE_MAX_LEN 256

#define TEMPERATURE_ALERT 30
The GetStarted.ino file contains the code for initial set up, that is, to make the device run. It contains the code for WiFi configuration, and Device to Cloud, Cloud to Device communication etc. Below is the sample code.
// Copyright (c) Microsoft. All rights reserved.
// Licensed under the MIT license.
// To get started please visit https://microsoft.github.io/azure-iot-developer-kit/docs/projects/connect-iot-hub?utm_source=ArduinoExtension&utm_medium=ReleaseNote&utm_campaign=VSCode
#include "AZ3166WiFi.h"
#include "AzureIotHub.h"
#include "DevKitMQTTClient.h"

#include "config.h"
#include "utility.h"
#include "SystemTickCounter.h"

static bool hasWifi = false;
int messageCount = 1;
static bool messageSending = true;
static uint64_t send_interval_ms;

//////////////////////////////////////////////////////////////////////////////////////////////////////////
// Utilities
static void InitWifi()
{
  Screen.print(2, "Connecting...");

  if (WiFi.begin() == WL_CONNECTED)
  {
    IPAddress ip = WiFi.localIP();
    Screen.print(1, ip.get_address());
    hasWifi = true;
    Screen.print(2, "Running... \r\n");
  }
  else
  {
    hasWifi = false;
    Screen.print(1, "No Wi-Fi\r\n ");
  }
}

static void SendConfirmationCallback(IOTHUB_CLIENT_CONFIRMATION_RESULT result)
{
  if (result == IOTHUB_CLIENT_CONFIRMATION_OK)
  {
    blinkSendConfirmation();
  }
}

static void MessageCallback(const char* payLoad, int size)
{
  blinkLED();
  Screen.print(1, payLoad, true);
}

static void DeviceTwinCallback(DEVICE_TWIN_UPDATE_STATE updateState, const unsigned char *payLoad, int size)
{
  char *temp = (char *)malloc(size + 1);
  if (temp == NULL)
  {
    return;
  }
  memcpy(temp, payLoad, size);
  temp[size] = '\0';
  parseTwinMessage(updateState, temp);
  free(temp);
}

static int  DeviceMethodCallback(const char *methodName, const unsigned char *payload, int size, unsigned char **response, int *response_size)
{
  LogInfo("Try to invoke method %s", methodName);
  const char *responseMessage = "\"Successfully invoke device method\"";
  int result = 200;

  if (strcmp(methodName, "start") == 0)
  {
    LogInfo("Start sending temperature and humidity data");
    messageSending = true;
  }
  else if (strcmp(methodName, "stop") == 0)
  {
    LogInfo("Stop sending temperature and humidity data");
    messageSending = false;
  }
  else
  {
    LogInfo("No method %s found", methodName);
    responseMessage = "\"No method found\"";
    result = 404;
  }

  *response_size = strlen(responseMessage) + 1;
  *response = (unsigned char *)strdup(responseMessage);

  return result;
}

//////////////////////////////////////////////////////////////////////////////////////////////////////////
// Arduino sketch
void setup()
{
  Screen.init();
  Screen.print(0, "IoT DevKit");
  Screen.print(2, "Initializing...");

  Screen.print(3, " > Serial");
  Serial.begin(115200);

  // Initialize the WiFi module
  Screen.print(3, " > WiFi");
  hasWifi = false;
  InitWifi();
  if (!hasWifi)
  {
    return;
  }

  LogTrace("HappyPathSetup", NULL);

  Screen.print(3, " > Sensors");
  SensorInit();

  Screen.print(3, " > IoT Hub");
  DevKitMQTTClient_SetOption(OPTION_MINI_SOLUTION_NAME, "DevKit-GetStarted");
  DevKitMQTTClient_Init(true);

  DevKitMQTTClient_SetSendConfirmationCallback(SendConfirmationCallback);
  DevKitMQTTClient_SetMessageCallback(MessageCallback);
  DevKitMQTTClient_SetDeviceTwinCallback(DeviceTwinCallback);
  DevKitMQTTClient_SetDeviceMethodCallback(DeviceMethodCallback);

  send_interval_ms = SystemTickCounterRead();
}

void loop()
{
  if (hasWifi)
  {
    if (messageSending &&
        (int)(SystemTickCounterRead() - send_interval_ms) >= getInterval())
    {
      // Send teperature data
      char messagePayload[MESSAGE_MAX_LEN];

      bool temperatureAlert = readMessage(messageCount++, messagePayload);
      EVENT_INSTANCE* message = DevKitMQTTClient_Event_Generate(messagePayload, MESSAGE);
      DevKitMQTTClient_Event_AddProp(message, "temperatureAlert", temperatureAlert ? "true" : "false");
      DevKitMQTTClient_SendEventInstance(message);

      send_interval_ms = SystemTickCounterRead();
    }
    else
    {
      DevKitMQTTClient_Check();
    }
  }
  delay(1000);
}
Below is the content of the file utility.h.
#ifndef UTILITY_H
#define UTILITY_H

void parseTwinMessage(DEVICE_TWIN_UPDATE_STATE, const char *);
bool readMessage(int, char *);

void SensorInit(void);

void blinkLED(void);
void blinkSendConfirmation(void);
int getInterval(void);
We will be defining all these functions inside the file called utility. file, and that’s where most of our codes are going to be. When you are finished the Get started the tutorial, the initial code will contain the functions which can read the temperature, humidity information from the sensor and send to the cloud. And as you have guessed, it is missing the code for reading and sending the pressure information. Here we are going to do that. Below is the initial code.
// Copyright (c) Microsoft. All rights reserved.
// Licensed under the MIT license.

#include "HTS221Sensor.h"
#include "AzureIotHub.h"
#include "Arduino.h"
#include "parson.h"
#include "config.h"
#include "RGB_LED.h"

#define RGB_LED_BRIGHTNESS 32

DevI2C *i2c;
HTS221Sensor *sensor;
static RGB_LED rgbLed;
static int interval = INTERVAL;
static float humidity;
static float temperature;

int getInterval()
{
    return interval;
}

void blinkLED()
{
    rgbLed.turnOff();
    rgbLed.setColor(RGB_LED_BRIGHTNESS, 0, 0);
    delay(500);
    rgbLed.turnOff();
}

void blinkSendConfirmation()
{
    rgbLed.turnOff();
    rgbLed.setColor(0, 0, RGB_LED_BRIGHTNESS);
    delay(500);
    rgbLed.turnOff();
}

void parseTwinMessage(DEVICE_TWIN_UPDATE_STATE updateState, const char *message)
{
    JSON_Value *root_value;
    root_value = json_parse_string(message);
    if (json_value_get_type(root_value) != JSONObject)
    {
        if (root_value != NULL)
        {
            json_value_free(root_value);
        }
        LogError("parse %s failed", message);
        return;
    }
    JSON_Object *root_object = json_value_get_object(root_value);

    double val = 0;
    if (updateState == DEVICE_TWIN_UPDATE_COMPLETE)
    {
        JSON_Object *desired_object = json_object_get_object(root_object, "desired");
        if (desired_object != NULL)
        {
            val = json_object_get_number(desired_object, "interval");
        }
    }
    else
    {
        val = json_object_get_number(root_object, "interval");
    }
    if (val > 500)
    {
        interval = (int)val;
        LogInfo(">>>Device twin updated: set interval to %d", interval);
    }
    json_value_free(root_value);
}

void SensorInit()
{
    i2c = new DevI2C(D14, D15);
    sensor = new HTS221Sensor(*i2c);
    sensor->init(NULL);

    humidity = -1;
    temperature = -1000;
}

float readTemperature()
{
    sensor->reset();

    float temperature = 0;
    sensor->getTemperature(&temperature);

    return temperature;
}

float readHumidity()
{
    sensor->reset();

    float humidity = 0;
    sensor->getHumidity(&humidity);

    return humidity;
}

bool readMessage(int messageId, char *payload)
{
    JSON_Value *root_value = json_value_init_object();
    JSON_Object *root_object = json_value_get_object(root_value);
    char *serialized_string = NULL;

    json_object_set_number(root_object, "messageId", messageId);

    float t = readTemperature();
    float h = readHumidity();
    bool temperatureAlert = false;
    if(t != temperature)
    {
        temperature = t;
        json_object_set_number(root_object, "temperature", temperature);
    }
    if(temperature > TEMPERATURE_ALERT)
    {
        temperatureAlert = true;
    }

    if(h != humidity)
    {
        humidity = h;
        json_object_set_number(root_object, "humidity", humidity);
    }
    serialized_string = json_serialize_to_string_pretty(root_value);

    snprintf(payload, MESSAGE_MAX_LEN, "%s", serialized_string);
    json_free_serialized_string(serialized_string);
    json_value_free(root_value);
    return temperatureAlert;
}
We use different sensors for different items, thus different abstract classes for different things. For example, the abstract class HTS221Sensor is used for Humidity and Temperature, and LPS22HBSensor sensor for pressure.
So let’s include the LPS22HBSensor.
#include "LPS22HBSensor.h"
#include "utility.h"
Now, create a reference of the same.
LPS22HBSensor *pSensor;
static float pressure;
Modify the SensorInit() function by initializing the class LPS22HBSensor.
void SensorInit()
{
    i2c = new DevI2C(D14, D15);
    sensor = new HTS221Sensor(*i2c);
    sensor->init(NULL);

    pSensor = new LPS22HBSensor(*i2c);
    pSensor->init(NULL);

    humidity = -1;
    temperature = -1000;
    pressure = 0;
}
Now, create a new function which can read the Pressure from the sensor.
float readPressure()
{
    float pressure = 0;
    pSensor->getPressure(&pressure);

    return pressure;
}
Now it is time to add the pressure information to the output JSON file, by using the function json_object_set_number. Modify the function readMessage with the following code.
float p = readPressure();
if (p != pressure) {
    pressure = p;
    json_object_set_number(root_object, "pressure", pressure);
}
Now, we have done coding for our device, and it is time to upload the code to the device.
Upload the Code to IoT Device
As we already have the IoT Workbench tool installed, it is super easy to upload the new code to the device. Press F1 in Visual Studio code and select ‘Azure IoT Device Workbench: Upload Device Code’. This command will compile your code, and it throws the error in the Output terminal if there are any. It does the following actions.
- Load the configurations
- Initialize the packages
- Prepare your board for the upload, the Programming LED will blink at this time
- Verify everything
If everything goes well, you should be able to see an output as below.
Global variables use 60920 bytes (23%) of dynamic memory, leaving 201224 bytes for local variables. Maximum is 262144 bytes.
Uploading...
Info : clock speed 1800 kHz
Info : STLINK v2 JTAG v31 API v2 SWIM v21 VID 0x0483 PID 0x374B
Info : using stlink api v2
Info : Target voltage: 3.307278
** Programming Started **
auto erase enabled
Info : device id = 0x30006441
Info : flash size = 1024kbytes
** Programming Finished **
** Verify Started **
target halted due to breakpoint, current mode: Thread
xPSR: 0x61000000 pc: 0x2000002e msp: 0x200073fc
verified 578060 bytes in 1.120772s (503.681 KiB/s)
** Verified OK **
** Resetting Target **
shutdown command invoked
[Done] Uploaded the sketch: GetStarted.ino
Check the Device to Cloud Messages
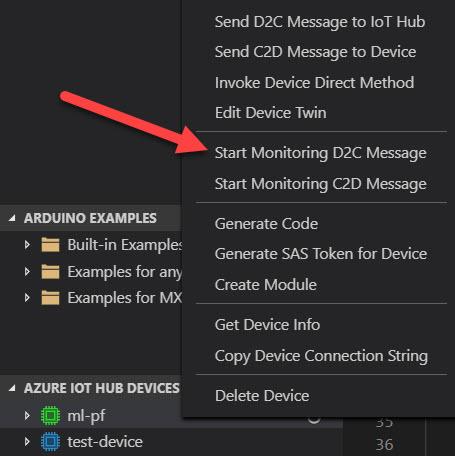
Now, it is time to check the information we are passing to our Azure IoT Hub. Go to Azure IoT Hub Devices section in Visual Studio Code, and right-click on the device and select ‘Start Monitoring Device to Cloud (D2C) Message’

A new Output Terminal will get opened, where you can see the data we send to cloud.

[IoTHubMonitor] Start monitoring D2C message for [ml-pf] ...
[IoTHubMonitor] Created partition receiver [0] for consumerGroup [$Default]
[IoTHubMonitor] Created partition receiver [1] for consumerGroup [$Default]
[IoTHubMonitor] Created partition receiver [2] for consumerGroup [$Default]
[IoTHubMonitor] Created partition receiver [3] for consumerGroup [$Default]
[IoTHubMonitor] [11:16:45 AM] Message received from [ml-pf]:
{
  "body": {
    "messageId": 198,
    "temperature": 28,
    "pressure": 1007.074707
  },
  "applicationProperties": {
    "temperatureAlert": "false"
  }
}
Conclusion
Wow!. Now we have learned,
- How to use IoT Workbench tool in Visual Studio Code
- How to set up your MXChip device
- How to write C++ code for Arduino
- How to get the Pressure information from the sensor
- How to upload the new code to MXChip device
- How to perform the Device to Cloud message output.
Please consider reading my IoT articles here for the continuation.
Your turn. What do you think?
Thanks a lot for reading. Did I miss anything that you may think which is needed in this article? Could you find this post as useful? Kindly do not forget to share me your feedback.
Kindest Regards
Sibeesh Venu