
In this post we will try to create a time zone calculator. We will be calculating the timezone in two ways.
We will be using Visual Studio as our IDE. For jQuery implementation we will be creating some prototypes. hope you will like this.
Download Source Code
You can always download the source code from here: Time Zone Calculator
Background
In one of my project, we were saving some date values in UTC format in the server. And when we return the data we were not doing any calculation like converting the same date values to users location time, if it is India (UTC – IST), therefore I was asked to get the time zone values from client side and pass the same value to the server in each request. I had done this, and here I will show you how. As I explained above, we can do this in two ways.
We will be explaining these two methods one by one.
Using the code
First of all, create a new project in visual studio and install jQuery and bootstrap from NuGet package manager. Once your project is ready, we will start implementing our first method.
Using jQuery functions
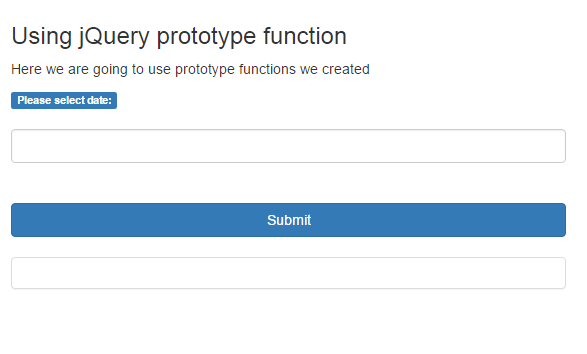
The first thing you need to do here is adding the needed elements to UI.
[html]
<div class="col-sm-6">
<h3>Using jQuery prototype function</h3>
<p>Here we are going to use prototype functions we created</p>
<div class="form-group">
<label class="label label-primary">Please select date:</label>
<br />
<br />
<input class="form-control" type="text" id="txtTimeZone" />
<br />
<br />
<input type="button" value="Submit" id="btnSubmit" class="btn btn-primary btn-block"/>
<br />
<div class="panel panel-default">
<div id="placeholder" class="panel-body"></div>
</div>
</div>
</div>
[/html]
Please add the needed references to your page.
[html]
<link href="Content/themes/base/all.css" rel="stylesheet" />
<link href="Content/bootstrap.min.css" rel="stylesheet" />
<link href="Content/Index.css" rel="stylesheet" />
<script src="Scripts/jquery-2.2.3.min.js"></script>
<script src="Scripts/jquery-ui-1.11.4.min.js"></script>
[/html]
Now, we are going to create some date prototypes to a js file TimeZone.js so that we can use it with any date objects.
[js]
Date.prototype.dst = function () {
return this.getTimezoneOffset() < this.stdTimezoneOffset();
}
[/js]
The above code is for finding whether the daylight time is ON or OFF, if it returns true means, the daylight time is OFF.
[js]
Date.prototype.stdTimezoneOffset = function () {
var jan = new Date(this.getFullYear(), 0, 1);
var jul = new Date(this.getFullYear(), 6, 1);
return (Math.max(jan.getTimezoneOffset(), jul.getTimezoneOffset()) * -1);
}
[/js]
The above prototype can be called when the daylight time is OFF.
[js]
Date.prototype.stdTimezoneOnset = function () {
var jan = new Date(this.getFullYear(), 0, 1);
var jul = new Date(this.getFullYear(), 6, 1);
return (Math.min(jan.getTimezoneOffset(), jul.getTimezoneOffset()) * -1);
}
[/js]
The above prototype can be called when the daylight time is ON.
Now we have created all the prototypes needed, shall we go and call use these now?
[js]
$(document).ready(function () {
$("#txtTimeZone").datepicker();
$(‘#btnSubmit’).click(function () {
var dayLight = new Date();
dayLight = new Date($(‘#txtTimeZone’).val());
if (dayLight.dst()) {
timeZoneValue = dayLight.stdTimezoneOffset();// Day light time is OFF
} else {
timeZoneValue = dayLight.stdTimezoneOnset();// Day light time is ON
}
$("#placeholder").text(‘The time zone value for ‘ + dayLight + ‘ is ‘ + timeZoneValue);
});
});
[/js]
Please run your page now to check the output.
Time zone calculation using jQuery
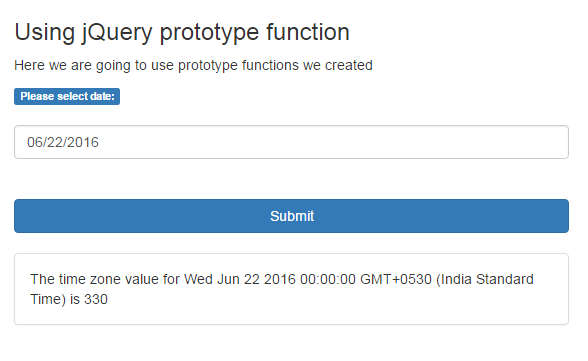
Time zone calculation using jQuery output
Now we will implement the second method, is that fine?
Using Google API
Before we start, please get your own map API key from google, you can follow this link to get a one.
I hope you got your own key now, if yes, you are ready to go. Please add some controls as below to your page.
[html]
<div class="col-sm-6">
<h3>Using Google API</h3>
<p>Here we are going to use Google API</p>
<div class="form-group">
<input id="pac-input" class="controls" type="text" placeholder="Search Box">
<div id="map"></div>
<script async defer src="https://maps.googleapis.com/maps/api/js?key=yourkey&libraries=places&callback=initAutocomplete" type="text/javascript"></script>
<div class="panel panel-default">
<div id="latlon" class="panel-body"></div>
</div>
</div>
</div>
[/html]
Here initAutocomplete is the callback function which we are going to write now.
[js]
function initAutocomplete() {
var map = new google.maps.Map(document.getElementById(‘map’), {
center: { lat: -33.8688, lng: 151.2195 },
zoom: 13,
mapTypeId: google.maps.MapTypeId.ROADMAP
});
// Create the search box and link it to the UI element.
var input = document.getElementById(‘pac-input’);
var searchBox = new google.maps.places.SearchBox(input);
map.controls[google.maps.ControlPosition.TOP_LEFT].push(input);
// Bias the SearchBox results towards current map’s viewport.
map.addListener(‘bounds_changed’, function () {
searchBox.setBounds(map.getBounds());
});
var markers = [];
// Listen for the event fired when the user selects a prediction and retrieve
// more details for that place.
searchBox.addListener(‘places_changed’, function () {
var places = searchBox.getPlaces();
debugger;
if (places.length == 0) {
return;
}
// Clear out the old markers.
markers.forEach(function (marker) {
marker.setMap(null);
});
markers = [];
// For each place, get the icon, name and location.
var bounds = new google.maps.LatLngBounds();
places.forEach(function (place) {
var icon = {
url: place.icon,
size: new google.maps.Size(71, 71),
origin: new google.maps.Point(0, 0),
anchor: new google.maps.Point(17, 34),
scaledSize: new google.maps.Size(25, 25)
};
// Create a marker for each place.
markers.push(new google.maps.Marker({
map: map,
icon: icon,
title: place.name,
position: place.geometry.location
}));
$(‘#latlon’).text(place.geometry.location.lat() + ‘,’ + place.geometry.location.lng() + ‘, The time zone value is ‘ + place.utc_offset);
if (place.geometry.viewport) {
// Only geocodes have viewport.
bounds.union(place.geometry.viewport);
} else {
bounds.extend(place.geometry.location);
}
});
map.fitBounds(bounds);
});
}
[/js]
And following is the custom code we have written for showing the timezone values to our text box.
[js]
$(‘#latlon’).text(place.geometry.location.lat() + ‘,’ + place.geometry.location.lng() + ‘, The time zone value is ‘ + place.utc_offset);
[/js]
Now it is time to add our styles.
[css]
#map {
width: 100%;
height: 200px;
background-color: #CCC;
}
.controls {
margin-top: 10px;
border: 1px solid transparent;
border-radius: 2px 0 0 2px;
box-sizing: border-box;
-moz-box-sizing: border-box;
height: 32px;
outline: none;
box-shadow: 0 2px 6px rgba(0, 0, 0, 0.3);
}
#pac-input {
background-color: #fff;
font-family: Roboto;
font-size: 15px;
font-weight: 300;
margin-left: 12px;
padding: 0 11px 0 13px;
text-overflow: ellipsis;
width: 300px;
}
#pac-input:focus {
border-color: #4d90fe;
}
.pac-container {
font-family: Roboto;
}
#type-selector {
color: #fff;
background-color: #4d90fe;
padding: 5px 11px 0px 11px;
}
#type-selector label {
font-family: Roboto;
font-size: 13px;
font-weight: 300;
}
#target {
width: 345px;
}
[/css]
Please be noted that if you don’t set height for the map container div, the map may not get loaded
So I have given the CSS for my map container as follows.
[css]
#map {
width: 100%;
height: 200px;
background-color: #CCC;
}
[/css]
Now please run your page, you can see a map in your page. Please search for any location, it will give you the timezone value for the given location. Shall we check?
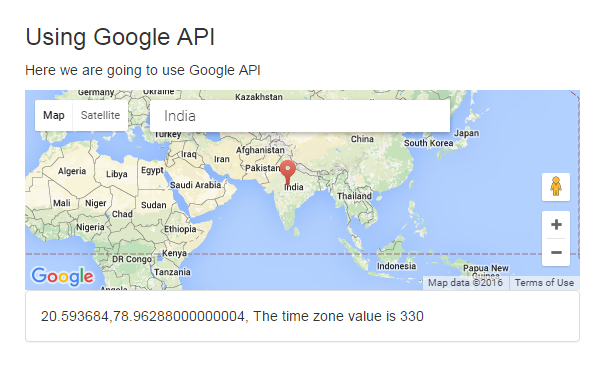
Time zone calculation using Google API
Please make sure that the value you get from both ways is same.
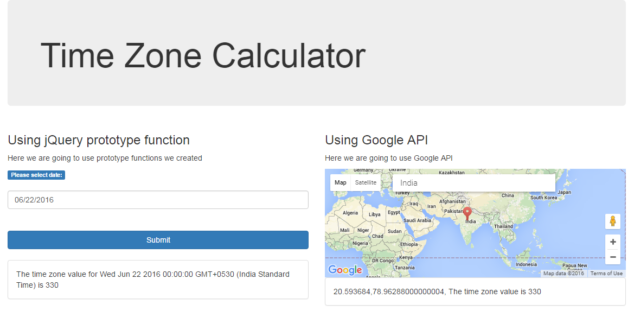
Time zone calculation
That’s all, have a happy coding!.
Conclusion
Did I miss anything that you may think which is needed? Could you find this post as useful? I hope you liked this article. Please share me your valuable suggestions and feedback.
Your turn. What do you think?
A blog isn’t a blog without comments, but do try to stay on topic. If you have a question unrelated to this post, you’re better off posting it on C# Corner, Code Project, Stack Overflow, Asp.Net Forum instead of commenting here. Tweet or email me a link to your question there and I’ll definitely try to help if I can.
Kindest Regards
Sibeesh Venu