
Why not secure your keys and secrets in your application, if you can do it in a few minutes? If this question makes you think at least for a minute, then don’t think more, just do it. Here in this post, we will secure our connection string and use it in our application. Sounds good? Then, let’s start.
Prerequisites
I will try to make this post as simple as it can, however, a basic idea of the preceding things definitely makes things easier.
- Azure Key Vault
- Azure App Service
- Asp Net Core
- C#
Please remember that you need a valid Azure subscription. If you are looking to secure your Azure Function app settings, read my post here.
Build an Asp Net Core Web App
At thing stage, I am assuming that you already have an application, if you don’t have just create a sample application using some visual studio templates. Once the application is loaded, we can install the package “Microsoft.Extensions.Configuration.AzureKeyVault” from NuGet. As I said earlier, we will be using Azure services for this demo, we can leverage the option called ” Managed Identities” in Azure. Please be noted that if you are using any other cloud providers, the steps will be different.
Now, what is Managed Identities in Azure?
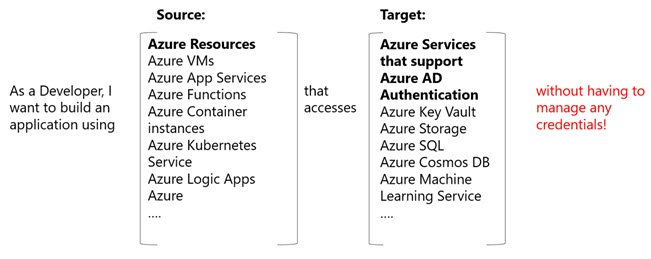
The one challenge we developers will always have is about the security and where we can save them and use them without compromising on the credentials. Azure Managed Identity will provide an identity for the resource in Azure AD and use the same to get the Azure Active Directory token. This token will be used to communicate between the services, in our cases, our Azure app service will talk to the Key Vault. The Managed Identity service is free of cost, another reason why not to use it.
There are two types of Managed Identities.
- System-assigned
- User-assigned
The System-assigned managed identity is tied to the Azure resource where you add the identity, this means that when you deleted the resource the identity will also be deleted automatically. Only some Azure resources support this identity type.
In the User-assigned identity, we can create a managed identity as a standalone Azure resource, the advantage of doing so, is that we can assign this identity to any resources we need and it is not tied to any resources. Thus, deleting a resource will not delete the identity. The preceding image explains when you can use a managed identity.

In our case, we need to get the secrets from our Key Vault and use the same in our Azure App service, thus I am going to use the System-assigned managed identity. I am sure, you know why.
Update the Appsetting
In the “appsettings.json,” we will be providing the Key vault name and that is it. No more connection string, no more client id, client secret, etc. Here is the sample setting file.
Now, let’s configure our app to use the values from the Azure Key Vault. Go to the “Program. cs” file and update the method CreateHostBuilder as follows.
As you can see that in the above code, we create an instance of “AzureServiceTokenProvider” without a connection string, and the provider will get an access token from the managed identity. Now let’s go to our Startup class and add the preceding code in the ConfigureServices method.
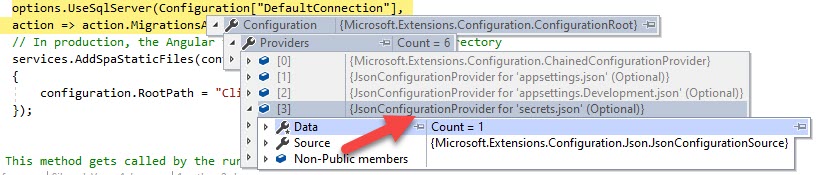
options.UseSqlServer(Configuration["DefaultConnection"],
            action => action.MigrationsAssembly(typeof(TenantContext).Assembly.FullName)));
That’s all. Now if you run this application you will get an error saying that “Value can not be null”. Remember that we have not created the Azure resources.
Configure Azure App Service and Azure Key Vault
Once you create your Azure Key Vault and Azure App Service, go to your Azure Key Vault and click on the secrets and add the secrets you have, in our case, a connection string. I will give the secret name “DefaultConnection” and the value as my database connection string.
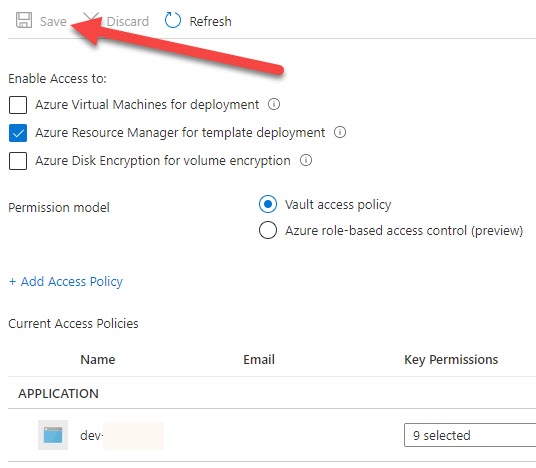
An application deployed Azure App Service is automatically registered with Azure AD when the service is created. Let’s go to the identity panel of the Azure App service that you had created and enable the System-assigned managed identity.

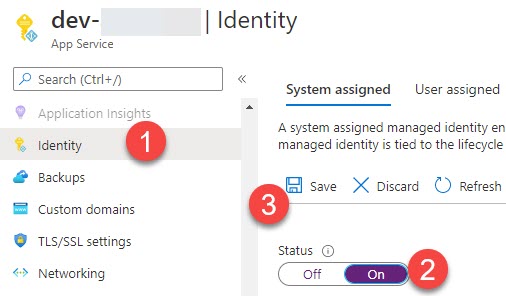
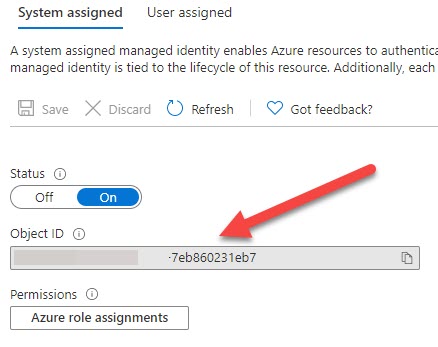
Please be noted that once you click on the save button, the app service will be registered with Azure Active Directory and it can be granted permission to access resources protected by Azure AD. Now, get the object id from the screen and make a note of the same, as we will be using this in a while.

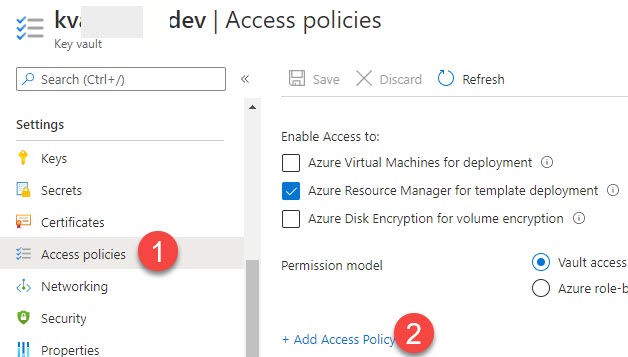
Now, go to the Azure Key Vault you have created and click on the “Access policies” from the left side pane, and click on the “+Add Access Policy”.

From the next screen, select the items as in the preceding image. Please be noted that you can choose the permissions that you want to set. In the “Select Principal” screen, search the item with the object id of our app service. Select the item and click save. This is how your screen may look like.

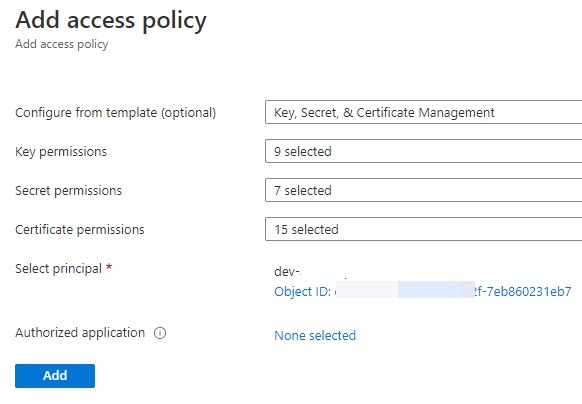
Click on the Add button. The policy will be added. Please do not forget to remember to click on the Save button from the next screen.

Do not forget to restart the Azure App Service, this is important. Now go ahead and publish your Asp Net Core application to your Azure App service. You can also use the Visual Studio Publish option or use the Azure DevOps pipeline. If you choose the second option, read my detailed article about it here.
That’s it. Well done. We now have a running application in the Azure app service, that fetches the secrets from the Azure Key Vault and uses them. But, will it work with the development environment? No, that requires a few more setups.
Secret Storage for Development Environment
Here, we are going to use a tool called Secret Manager. This tool will help us not to save any sensitive data in the application. Please be noted that the tool doesn’t encrypt the values, thus use it only for the development environment. This tool operates on project-specific configuration settings stored in your user profile. Go to your project home directory and run the preceding command to enable the Secret Storage.
dotnet user-secrets initThis will produce the output below.

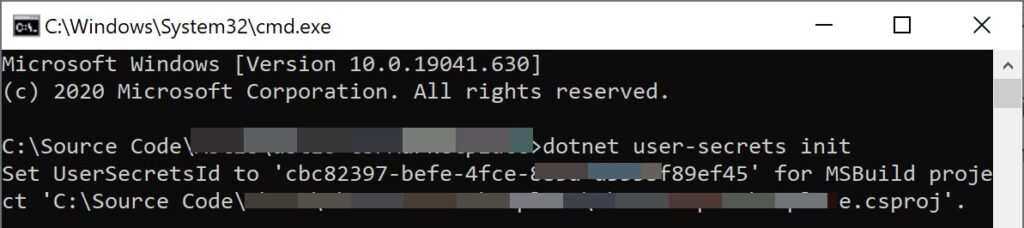
Now, if you check the content of your “.csproj” file, you will see that a new property is added to the property group with GUID as value.
<UserSecretsId>cbc82397-befe-4fce-885d-d355bf89ef45</UserSecretsId>Right-click on your project and click on the Manage User Secrets, this will show a “secret.json” file and this is where we are going to add all of our secrets, shh don’t say this to anyone. This is the location where this file is located “C:\Users\SibeeshVenu\AppData\Roaming\Microsoft\UserSecrets”. We can edit our secret.json file with the connection string, this is how your file may look like.
{
  "DefaultConnection": "yourconnectionstring"
}
Save the file, and run your application, it should work as it is. The secrets configuration source is automatically added to the development environment. Just look at the providers in the Configuration object now.

You can also add any properties via command line.
dotnet user-secrets set "AzureAd:ClientSecret" "secretvalue"Here AzureAd is my object literal with a property ClientSecret in it. Once you run the command, you will get a response in the command line as preceding.

You can do many other things with this tool, I strongly recommend you to read this post to know more.
Conclusion
Congratulations and thanks a lot for being with me this far. We now have a complete secured application where we didn’t compromise on the credentials and secrets. Happy Coding!.
About the Author
I am yet another developer who is passionate about writing and video creation. I have written close to 500 blogs on my blog. And I upload videos on my YouTube channels Njan Oru Malayali and Sibeesh Passion. Please feel free to follow me.
Your turn. What do you think?
Thanks a lot for reading. Did I miss anything that you may think which is needed in this article? Could you find this post useful? Kindly do not forget to share your feedback.
Kindest Regards
Sibeesh Venu