Working With Client Side Local Storage
[toc]
Introduction
In this article, we will learn how to use local storage in HTML5. For many years, we developers were depending on the server only for saving the data. And we used to retrieve the data by sending a request to our server and by manipulating some queries we could manage the formation, updating, insertion and so on. Great, we were doing a fantastic job.
But as the day’s passes, we must move on to the next level. Nowadays all are busy in their life, so a person can wait a maximum of a few seconds for a request that he has given in your blog, or website, or in your product. If it takes much time, he/she will just close the window and start searching for an alternative. Am I right?
Yeah, it happens when you are depending completely on the server. For each query, it will take some seconds. Just because of this, we started using the client-side state management techniques, mostly cookies.
But we do have the following issues if we are using cookies also:
The cookies can have only a limited amount of data, which is definitely not enough for us to work on (4096 bytes).
And as the number of requests increases, the data amount in cookies also increase. So at a point in time, we may encounter some performance issues. So in the modern web, we have a new solution, Local Storage.
Source Code
Download the source code here: Local Storage
Background
Currently, I am working on a dashboard application. As you all know a dashboard application must be as fast as possible. It must not make a user wait. So most of our codes are on the client side. So we are storing the necessary data on the client side itself, that makes my app fast. And we are using jQuery.
Using the code
Now we will work on how to save the data in local storage and retrieve it when we need it.
Saving the Data
To save the data we do have a function called setItem(). We can use the following syntax.
[js]
localStorage.setItem(“item”, “http://sibeeshpassion.com/”)
[/js]
Before going for this, you must check that your browser supports this feature since this is only applicable to modern browsers.
To check whether it supports it or not:
[js]
if (localStorage) {
}
else {
$(“#showitem”).text(“your browser does not support this feature”);
}
[/js]
Retrieving the data from local storage
We can use the getItem() function to retrieve the data from the local storage.
Please see the following syntax.
[js]
var itm = localStorage.getItem(“item”);
[/js]
Great, you have it. Congratulations.
Now we will work on how to remove this item from local storage.
Removing data from the local storage
To remove the data form the local storage, please see the following syntax.
[js]
localStorage.removeItem(“item”);
[/js]
Removing the all data from localStorage
To remove the data form the localStorage, please see the following syntax.
[js]
localStorage.clear();
[/js]
Demo
Here we will create 3 buttons and one h2 tag as in the following markup.
[html]
<input type=“submit” id=“setitem” value=“set Item” />
<input type=“submit” id=“getitem” value=“get Item” />
<input type=“submit” id=“removeitem” value=“remove Item” />
<h2 id=“showitem”></h2>
[/html]
Now we will add the jQuery reference.
[js]
<script src=“jquery-1.11.1.min.js”></script>
[/js]
Set the Item
[js]
$(“#setitem”).click(function () {
localStorage.setItem(“item”, “http://sibeeshpassion.com/”)
});
[/js]
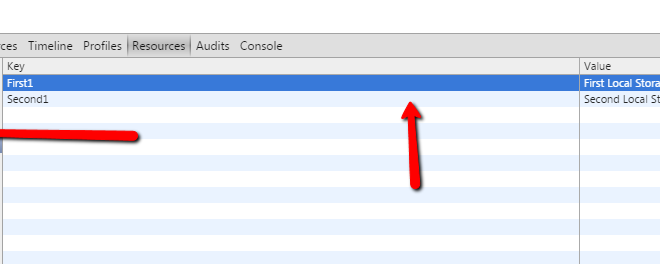
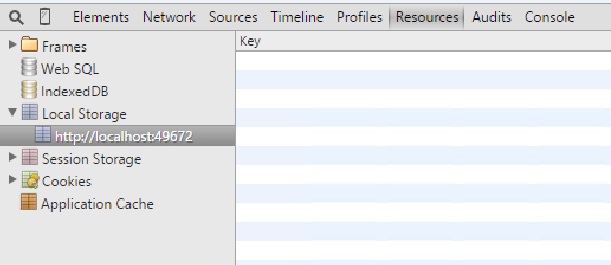
Once you set the item to localStorage, you can see it in your browser. To see it, press F12 after pressing the set Item button, then go to the resources tab.
Figure: Prior to setting the item
Figure: After setting the item
Get the Item
[js]
$(“#getitem”).click(function () {
var itm = localStorage.getItem(“item”)
$(“#showitem”).text(itm);
});
[/js]
Remove the Item
[js]
$(“#removeitem”).click(function () {
localStorage.removeItem(“item”);
$(“#showitem”).text(”);
});
[/js]
Complete Code
[html]
<!DOCTYPE html>
<html xmlns=“http://www.w3.org/1999/xhtml”>
<head>
<title>Use Of Local Storage – Sibeesh|Passion</title>
<script src=“jquery-1.11.1.min.js”></script>
<script>
$(function () {
if (localStorage) {
$(“#setitem”).click(function () {
localStorage.setItem(“item”, “http://sibeeshpassion.com/”)
});
$(“#getitem”).click(function () {
var itm = localStorage.getItem(“item”)
$(“#showitem”).text(itm);
});
$(“#removeitem”).click(function () {
localStorage.removeItem(“item”);
$(“#showitem”).text(”);
});
}
else {
$(“#showitem”).text(“your browser does not support this feature”);
}
});
</script>
</head>
<body>
<input type=“submit” id=“setitem” value=“set Item” />
<input type=“submit” id=“getitem” value=“get Item” />
<input type=“submit” id=“removeitem” value=“remove Item” />
<h2 id=“showitem”></h2>
</body>
</html>
[/html]
Conclusion
Thanks a lot for reading. Did I miss anything that you may think which is needed? Could you find this post as useful? I hope you liked this article. Please share me your valuable suggestions and feedback.
Your turn. What do you think?
A blog isn’t a blog without comments, but do try to stay on topic. If you have a question unrelated to this post, you’re better off posting it on C# Corner, Code Project, Stack Overflow, Asp.Net Forum instead of commenting here. Tweet or email me a link to your question there and I’ll definitely try to help if I can.
Kindest Regards
Sibeesh Venu


