
[toc]
Introduction
Wow, you are going to create your own package? Either a private one or a public one? You were looking for a documentation on how to create your own package in NPM, and you ended up landing here? No, worries, in this post I will help you with that. At the end of this article, you will get to know how can you create your own package in the NPM registry. Enough talking, let’s jump into the coding. I hope you will find this post useful.
Source Code
The source code can be found here.
Background
Sometimes creating your own packages will be essential especially when you work with some big companies/clients where they can reuse their components/packages. Doesn’t it really make sense? As a developer, it is our job to give that option to our client. In this article, I will be creating
- an Angular application
- the build and publish the angular application to the NPM registry
- another application, where we can use the NPM package which we have created
Before you start with, please make sure that you have an account in npmjs, so that you can publish your package there. You can always have a private space in NPM registry, but you must pay for that service, hence in this article, I will walk you through how we can publish your packages to publically, however the steps are going to be same for Private as well.
Creating your Angular application
The first thing we are going to do is to create an application and I will name this org-npm-package.
Installing Angular CLI
Yes, as you guessed, we are using Angular CLI. If you haven’t installed Angular CLI, I recommend you to install the same. It is a great CLI tool for Angular, I am sure you will love that. You can do that by running the below command.
npm install -g @angular/cli
Once we set up this project we will be using the Angular CLI commands and you can check Angular CLI documentation for understanding the things you can do with the CLI.
Generating a new project
Now it is time to generate our new project. We can use the below command for the same.
ng new org-npm-package
And you will be able to see all the hard work this CLI is doing for us. Now that we have created our application, let’s run our application and see if it is working or not.
ng serve --open (if you need to open the browser by the app)
ng serve (if you want to manually open the browser).
You can always use 'ng s' as well
The command will build your application and run it in the browser.
As we develop we will be using the Angular material for the design and we can install it now itself along with the animation and cdk. With the Angular 6+ versions you can also do this by following the below command.
ng add @angular/material
Generate menu module and ng-private-menu component
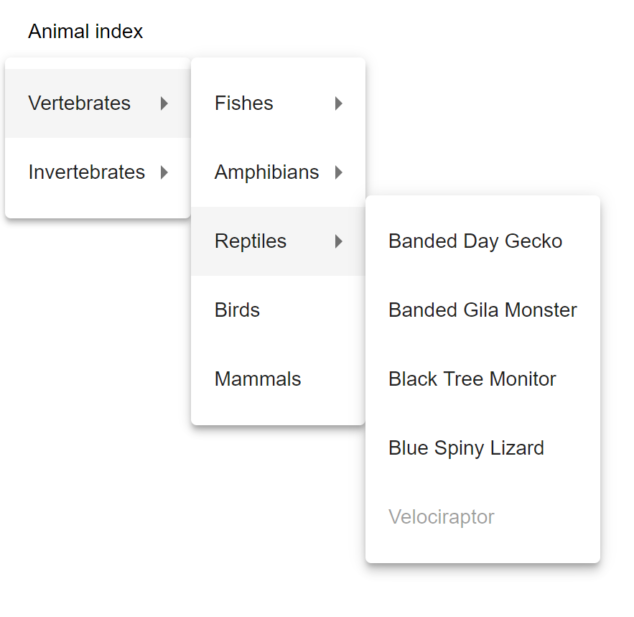
Now we have an application to work with and let’s create a module called Menu and a component ng-private-menu now.
ng g m modules/menu
ng g c modules/ng-private-menu
The above command will generate all the files you need to work with. I am going to edit only the HTML of the ng-private-menu component for myself and not going to add any logic. You can add anything you wish.
<div>
  <button mat-button [matMenuTriggerFor]="animals">Animal index</button>

  <mat-menu #animals="matMenu">
    <button mat-menu-item [matMenuTriggerFor]="vertebrates">Vertebrates</button>
    <button mat-menu-item [matMenuTriggerFor]="invertebrates">Invertebrates</button>
  </mat-menu>

  <mat-menu #vertebrates="matMenu">
    <button mat-menu-item [matMenuTriggerFor]="fish">Fishes</button>
    <button mat-menu-item [matMenuTriggerFor]="amphibians">Amphibians</button>
    <button mat-menu-item [matMenuTriggerFor]="reptiles">Reptiles</button>
    <button mat-menu-item>Birds</button>
    <button mat-menu-item>Mammals</button>
  </mat-menu>

  <mat-menu #invertebrates="matMenu">
    <button mat-menu-item>Insects</button>
    <button mat-menu-item>Molluscs</button>
    <button mat-menu-item>Crustaceans</button>
    <button mat-menu-item>Corals</button>
    <button mat-menu-item>Arachnids</button>
    <button mat-menu-item>Velvet worms</button>
    <button mat-menu-item>Horseshoe crabs</button>
  </mat-menu>

  <mat-menu #fish="matMenu">
    <button mat-menu-item>Baikal oilfish</button>
    <button mat-menu-item>Bala shark</button>
    <button mat-menu-item>Ballan wrasse</button>
    <button mat-menu-item>Bamboo shark</button>
    <button mat-menu-item>Banded killifish</button>
  </mat-menu>

  <mat-menu #amphibians="matMenu">
    <button mat-menu-item>Sonoran desert toad</button>
    <button mat-menu-item>Western toad</button>
    <button mat-menu-item>Arroyo toad</button>
    <button mat-menu-item>Yosemite toad</button>
  </mat-menu>

  <mat-menu #reptiles="matMenu">
    <button mat-menu-item>Banded Day Gecko</button>
    <button mat-menu-item>Banded Gila Monster</button>
    <button mat-menu-item>Black Tree Monitor</button>
    <button mat-menu-item>Blue Spiny Lizard</button>
    <button mat-menu-item disabled>Velociraptor</button>
  </mat-menu>
</div>
Once you have added that HTML, you should import some modules to your menu.module.ts file.
import { NgModule } from '@angular/core';
import { CommonModule } from '@angular/common';
import { NgPrivateMenuComponent } from '../ng-private-menu/ng-private-menu.component';
import { BrowserAnimationsModule } from '@angular/platform-browser/animations';
import { MatMenuModule, MatButtonModule } from '@angular/material';


@NgModule({
  declarations: [
    NgPrivateMenuComponent
  ],
  imports: [
    BrowserAnimationsModule,
    CommonModule,
    MatMenuModule,
    MatButtonModule
  ],
  exports: [
    NgPrivateMenuComponent
  ]
})
export class MenuModule { }
Set up app.module.ts
Now it is time to set our App Module. Every Angular app will be having at least one NgModule class AppModuleresides in app.module.ts.
import { BrowserModule } from '@angular/platform-browser';
import { NgModule } from '@angular/core';

import { AppRoutingModule } from './app-routing.module';
import { AppComponent } from './app.component';
import { MenuModule } from './modules/menu/menu.module';

@NgModule({
  declarations: [
    AppComponent
  ],
  imports: [
    BrowserModule,
    AppRoutingModule,
    MenuModule
  ],
  providers: [],
  bootstrap: [AppComponent]
})
export class AppModule { }
Run your application
Once you have done everything, you will be able to run “ng serve” and see your application working in the browser.
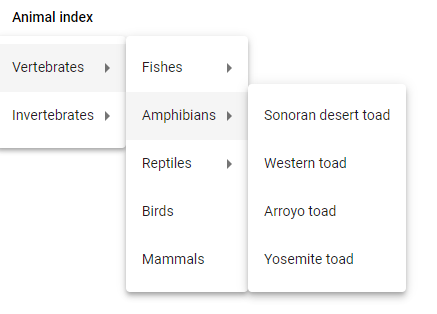
Angular application output
Creating the NPM package
Whenever we do something, it is always a good idea to check whether something is already there or not, to help our development easier. That’s the advantage of using NPM public registry, we can always search for public repositories or packages which will definitely help in our development process. We have such packages in this case as well, so we are going to use the package called “ng-packagr”.
According to the package documentation, the packagr is a tool which transpile your libraries to Angular package format. It is a great package which does its job very well. I would like to give a huge round of applause to the developers/collaborators of that package. Please feel free to see the documentation of that package. You can install the same by running the command below.
npm i ng-packagr
Setting up the package.json
The first thing we are going to do is, to set the package.json as per the requirement of the packagr. Please add the preceding code to your package.json file.
"$schema": "./node_modules/ng-packagr/package.schema.json",
  "name": "@sibeeshpassion/org-npm-package",
  "version": "2.0.0",
  "scripts": {
    "ng": "ng",
    "start": "ng serve",
    "build": "ng build",
    "test": "ng test",
    "lint": "ng lint",
    "e2e": "ng e2e",
    "packagr": "ng-packagr -p package.json"
  },
  "ngPackage": {
    "lib": {
      "entryFile": "public_api.ts"
    },
    "whitelistedNonPeerDependencies": [
      "@angular/animations",
      "@angular/cdk",
      "@angular/common",
      "@angular/compiler",
      "@angular/forms",
      "@angular/core",
      "@angular/http",
      "@angular/material",
      "@angular/platform-browser",
      "@angular/platform-browser-dynamic",
      "@angular/router",
      "core-js",
      "rxjs",
      "tsickle",
      "zone.js"
    ]
  }
The $schema is for making the editing easier and it will add the JSON editing support, especially if you are using the IDE VSCode.
The name is the name of your package. And it is a scoped name here. Did you notice that I have used @ before the SibeeshPassion? A scoped name should be started with @ and should be followed by a slash (/). It is a way of grouping all of your packages together in a common place. Doesn’t it make sense to have all of your company packages under your company name? It has some other benefits as well.
- You can get unique names for your package, as you will be the only one who can add a package to that group
- To install such packages, you need to use @your-org-name/your-package-name
You can always read more on the same topic here.
The script packagr is a custom script so that you can just run “npm run packagr” and everything else will be done in the background.
The ngPackage is the main settings for the packagr package, as it sets the entry point for our packaging. The file public_api.ts should be placed with the same directory of the package.json file. In our case, the public_api.ts contents will be as below.
export * from './src/app/modules/menu/menu.module';
We are exporting from our module menu.module.
Distributing npm packages with 'dependencies' is not recommended. Please consider adding @angular/animations to 'peerDependencies' or remove it from 'dependencies'.

BUILD ERROR
Dependency @angular/animations must be explicitly whitelisted.
Please keep in mind that if you make the property private to true, the npm will refuse to publish it, this is for avoiding accidental publication of private repositories.
Run the commands and generate the dist
As we have already configured our package.json file, now we can go and run the commands. Are you ready? The first thing we are going to run is “npm run packagr”. It will do the following things for you.
- Building Angular Package
- Building entry point ‘@sibeeshpassion/org-npm-package’
- Compiling TypeScript sources through ngc
- Bundling to FESM2015
- Bundling to FESM5
- Bundling to UMD
- Minifying UMD bundle
- Copying declaration files
- Writing package metadata
From the image below, you can understand that it is creating a folder called dist.
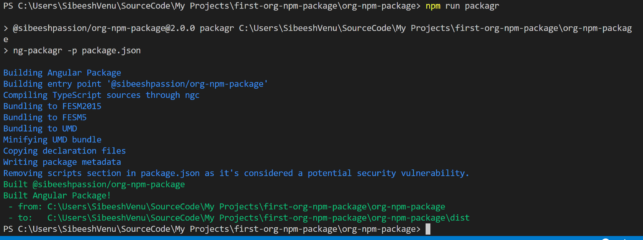
npm run packagr
If you just look at the dist folder you can see that all the packaging work has been done.
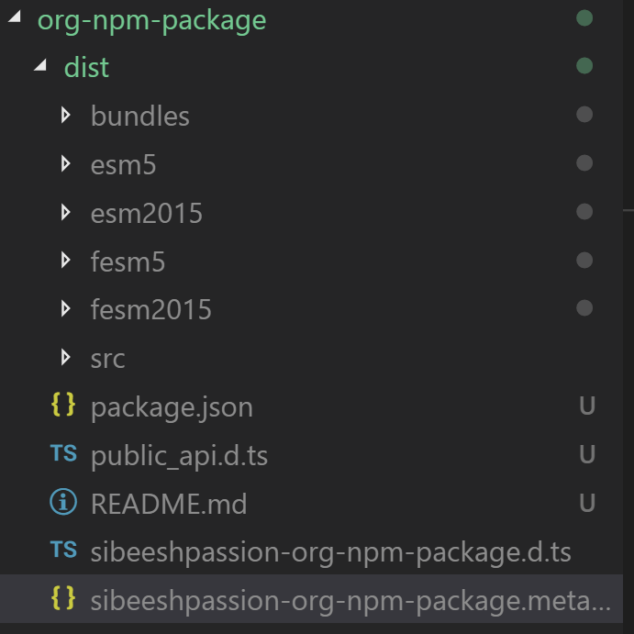
dist folder after packaging
Publishing your package to NPM registry
As our package is ready, we can go ahead and start publishing our package to the NPM registry.
npm publish dist
When you run the above command, if you haven’t signed up for private packages, you will get an error as below.
npm ERR! publish Failed PUT 402
npm ERR! code E402
npm ERR! You must sign up for private packages : @sibeeshpassion/org-npm-package
Let’s just publish this package publically now, so that I don’t want to pay anything. Before you do that, go to your package.json file and change the name from “name”: “@sibeeshpassion/org-npm-package” to “name”: “org-npm-package”. Run “npm run packagr” again. It will update your dist folder with the new files. The contents of the dist folder will be a little than the one we had for our organization.
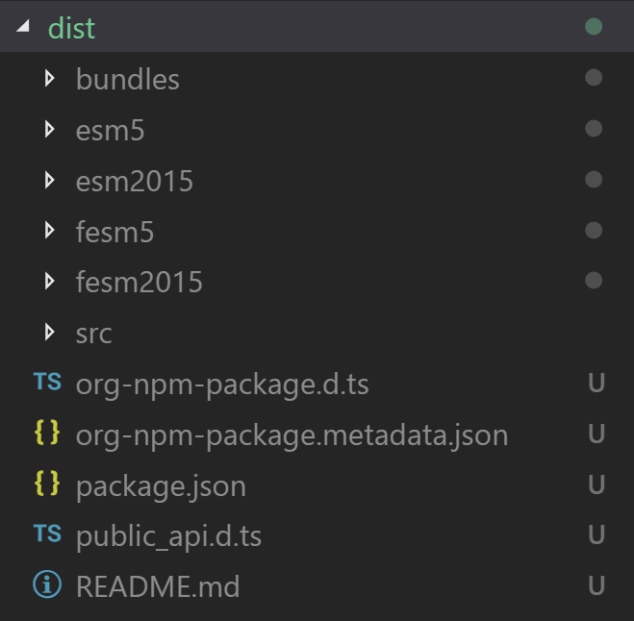
dist folder after packaging publically
Let’s just run “npm publish dist” again, this time we should not see any errors. Please be noted that you should run “npm login” before you run npm publish command.
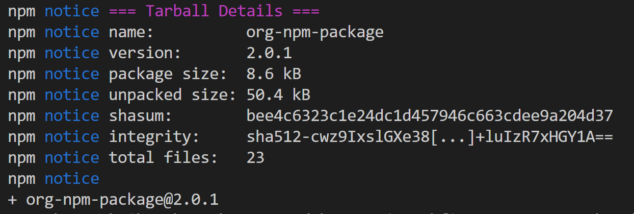
npm publish dist
Now if you look at your NPM registry you should be able to see your package.
Using the package in another solution
Wow!, we have successfully created an Angular NPM package, now we can easily use the same in our other applications. Let’s just create another application.
ng new use-org-npm-package
Once the application is been created, let’s just install the new package we have created.
npm i org-npm-package
Now, we can add our MenuModule to the new application’s app.module.ts file.
import { BrowserModule } from '@angular/platform-browser';
import { NgModule } from '@angular/core';

import { AppComponent } from './app.component';
import { MenuModule } from 'org-npm-package';

@NgModule({
  declarations: [
    AppComponent
  ],
  imports: [
    BrowserModule,
    MenuModule
  ],
  providers: [],
  bootstrap: [AppComponent]
})
export class AppModule { }
The only thing pending now is, to use the app-ng-private-menu in your app.component.html.
<app-ng-private-menu></app-ng-private-menu>
Output
Let’s just run our new application and see everything is working as expected.
my own npm package
Conclusion
Congratulation, you have created and used your own NPM package. In this article, we have learned how to,
- Create an angular 7 application
- Create a Private NPM package
- Create a Public NPM package
- Publish a package to NPM registry
- Use the created package in another solution
We will make this package to accept the properties while using the same so that we can easily pass the menu items from the application where this package is being consumed. Isn’t that the way to make a package reusable? Please feel free to play with this GitHub repository. Please do share me your findings while you work on the same. I really appreciate that, thanks in advance.
Your turn. What do you think?
Thanks a lot for reading. I will come back with another post on the same topic very soon. Did I miss anything that you may think which is needed? Could you find this post as useful? Kindly do not forget to share me your feedback.
Kindest Regards
Sibeesh Venu