
[toc]
Introduction
Here, in this post we are going to a see how we can resolve the error 404 ResourceNotFound Error After Uploading to Azure CDN . It is obvious that you may feel very sad, if you are unable to see the image you recently uploaded to Azure container. But, you don’t need to worry about it, as the fix for this error is very simple and in this post I am going to show you that. I hope you will like this. Now let’s begin.
Background
I recently created a new container in my Azure storage account and uploaded one image in it. And when I was just opening that image in my browser, I was just getting an error as preceding.
[xml]
This XML file does not appear to have any style information associated with it. The document tree is shown below.
ResourceNotFound
The specified resource does not exist. RequestId:36bdbcfb-0001-0022-44c6-d60b93000000 Time:2017-05-27T08:55:09.8382429Z
[/xml]
I was able to download that image and the problem exists only when I open it in the browser. Then I came to know about the Access policy of Azure containers. Here we are going to see a bit introduction about that policy.
Solution for Azure 404 Error
Step 1: Login to your Azure Portal and navigate to your container.
Step 2: Now, click on the three dots (…) and then Access Policy.
Step 3: Select the access type you prefer.
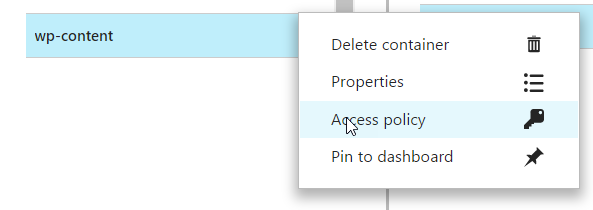
Option to see Azure Container Policy
According to Microsoft, Access Policy specifies whether data in the container may be accessed publicly. By default, container data is private to the account owner. Use ‘Blob’ to allow public read access for blobs. Use ‘Container’ to allow public read and list access to the entire container.
So here I am going to give the policy as Blob.
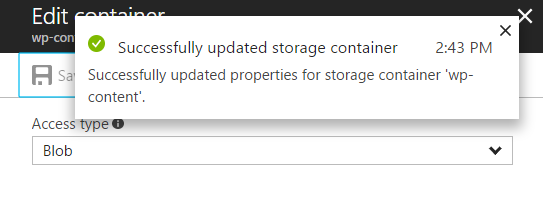
Change the Azure Access Policy to Blob
You can always do this with some C# code as well.
[csharp]
public static void SetPublicContainerPermissions(CloudBlobContainer container)
{
BlobContainerPermissions perm = container.GetPermissions();
perm.PublicAccess = BlobContainerPublicAccessType.Blob;
container.SetPermissions(perm);
}
[/csharp]
Here is the above example, we are accessing the permissions and assigning the Blob access type. You can always use ‘Container’ if you want to limit the access to container. In any case, if you need to remove the permission to anonymous users, you can use BlobContainerPublicAccessType.Off. Once you are done, please reload the URL again the browser, I am sure you will be able to see your image. Happy Uploading!.
Conclusion
Did I miss anything that you may think which is needed? Could you find this post as useful? I hope you liked this article. Please share me your valuable suggestions and feedback.
Your turn. What do you think?
A blog isn’t a blog without comments, but do try to stay on topic. If you have a question unrelated to this post, you’re better off posting it on C# Corner, Code Project, Stack Overflow, Asp.Net Forum instead of commenting here. Tweet or email me a link to your question there and I’ll definitely try to help if I can.
Kindest Regards
Sibeesh Venu