
I recently had to work with the so-called Microsoft Partner Center Secure App Model with KeyVault integration, so I went through the GitHub sample provided and downloaded the same. As it was a completely new thing for me, I had to go through many documentation provided by Microsoft, for example, this documentation says about the Authentication, and that’s exactly what I wanted to try. Sometimes following the document will not work, and I had to spend hours fixing the issues. That is the reason why I planned to write this post. I hope it will be helpful.
How does authentication work?
Before we go and set up our application it is important that you should understand how the authentication mechanism works here.
There are two kinds of authentication in the Partner Center.
- App-only, which will just be using the AD app we create.
- App + User, that will require both app and the user context.
Microsoft had created a new authentication model when we create App + User, which is the Secure application Model. This uses, multi-factor-authentication. This model is recommended and more secure, and with this approach, we can make sure that it supports all the operations as App-only authentication does not support some complex scenarios, for example, invoice operations.
We use a multi-tenant application and the initial registration for the application lives in the Host Azure AD tenant. When a user from a different tenant signs into the application for the first time, Azure AD asks for the consent and then a representation of the application (Service Principal) will be created in the user’s tenant.
This consent experience is based on the delegated permission we set in the app. And for us, it is important to give the appropriate permissions as we may have to act as the user. Below are the minimum set of permissions.
- Azure Active Directory delegated permissions: Access the directory assigned user.
- Partner Center APIs delegated permission: Access.
Please be noted that you will not be able to configure this application with your account, even though you create a new tenant with your MPN account, as both Azure Active Directory and Microsoft Partner Center application must be present in your tenants, then only you will be able to give the delegated permissions.

Read more about authentication here. You can also download the Secure Application Model framework document.
Partner Center Authentication – For better understanding!
Configure the Partner Consent Application
Once you clone the repository go to the secure-app-model folder in the root folder. Go to the folder keyvault and click on the solution file PartnerConsent.sln. Go to the Web.config file and that’s where all the configuration needs to be done. But if you working with the Partner Center for the first time, then things can be messy, it just won’t work. Let’s review the configuration one by one.
<!-- AppID that represents CSP application -->
<add key="ida:CSPApplicationId" value="ceec9e0d-d555-4472-952b-0ef9a77acba5 " />
This one is easier, this is the ID of the application that you had created using your SandBox account or using your Primary Partner Account. A Sandbox is for testing. No need to pay for the invoices, and will have a disclaimer “DO NOT PAY. THIS IS A SANDBOX INVOICE AND NO ACTION IS REQUIRED”.
Key things to consider:
- Both accounts act independently and do not share the same accounts, customers, etc.
- Supports transactions with a limited number of customers, orders, subscriptions, etc.
To create an integration sandbox, click here.
Once you have your sandbox account is configured go to the https://partner.microsoft.com and login with your Sandbox credential, click on the setting button on the right side of the page, and then click on the Account settings. Now from the left blade menu, click on the App management. This is where you actually create your application. You can create a Web App and Native App as per your requirement. If you are visiting this page for the first time, you will be given an option to create an application, and once that is done this is how it looks like.

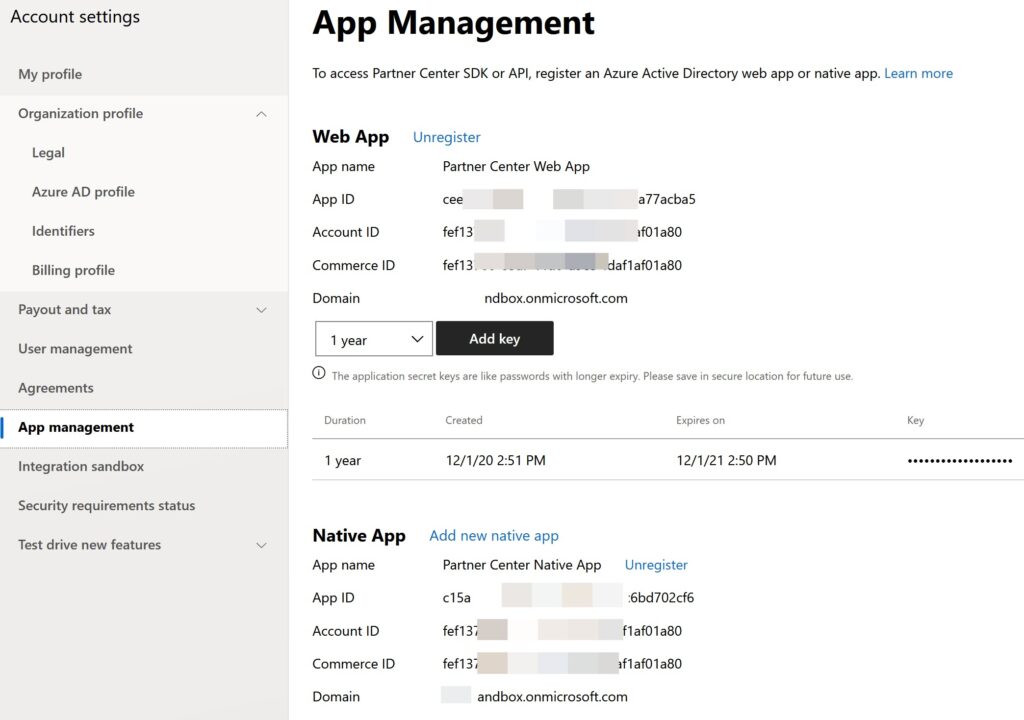
As you can see that every application has App ID, Account ID, Commerce ID, and Domain. Now copy the App ID of your application and paste it as the value of the key ida:CSPApplicationId in the web config file.
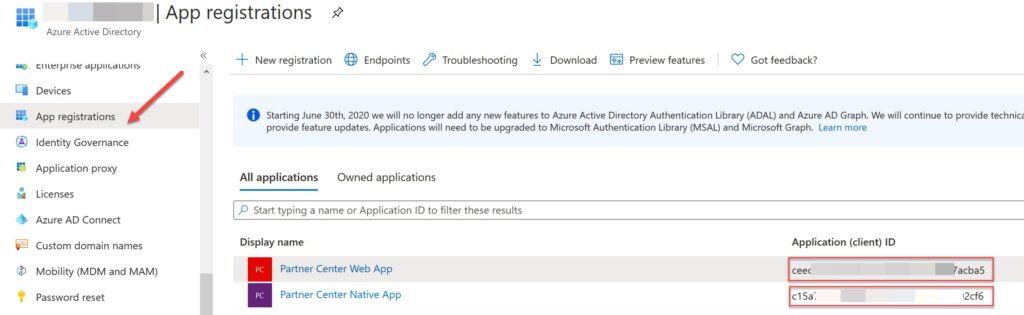
<add key="ida:CSPApplicationSecret" value=".Gqs~Qhfdq8.eO-_6DtJrDNn32.VavwP_C208" />This is the key we generate for our application, and you can create it by clicking on the Add key button (please see the above image). Make sure to copy this value before you refresh the page. Now, if you go to your tenant (tenant you create the Partner Center app), you should see that there are applications registered for your Partner Center applications. Go to your Azure AD, and then click on App Registration from the left-side blade.

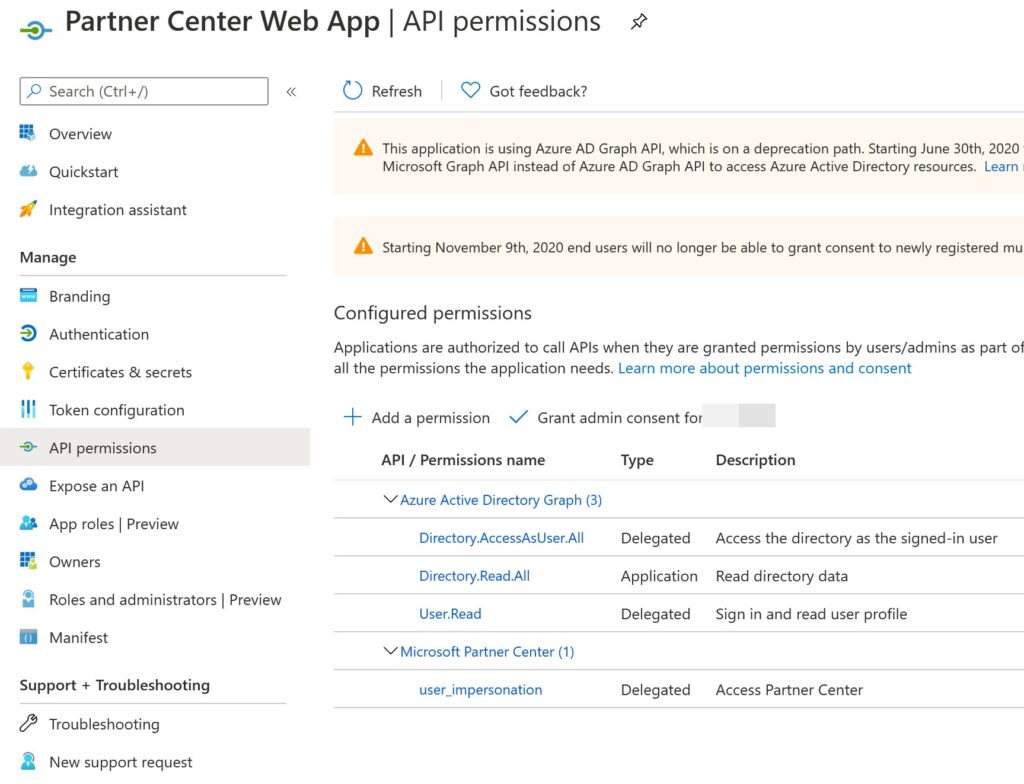
Just to be clear, click on the application, and go to the API permissions from the left-side pane, you should see that some delegated permissions are given to the Azure Active Directory and Microsoft Partner Center. Go to the Authentication page and add Redirect URI there, you can do this by clicking on the +Add platform button, from the next page select web and give the redirect URI, this is the URL of our MVC or .NET core application. For example, https://localhost:44395/.
Make sure that you add it correctly, even the trailing slash matters here. I was getting an error as ““error”:”invalid_client”,”error_description”:”AADSTS500112: The reply address ‘https://localhost:44395/‘ does not match the reply address ‘https://localhost:44395‘ provided when requesting Authorization code.”
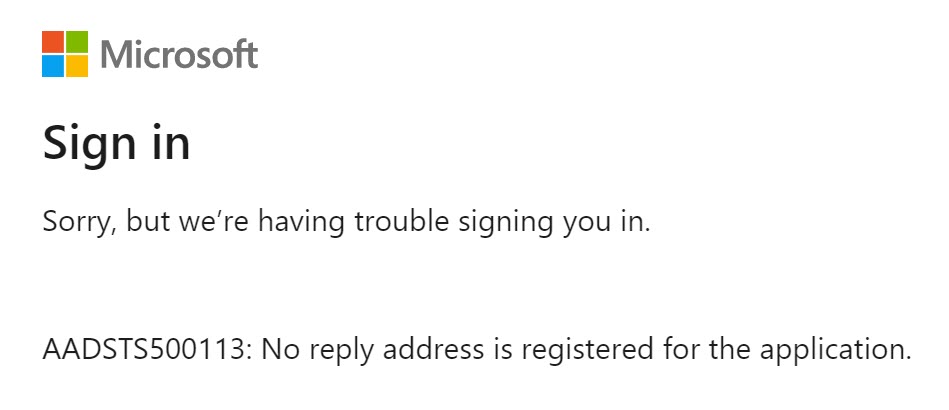
And if you don’t provide this reply URI, you will get an error “AADSTS500113: No reply address is registered for the application”

<!-- Endpoint address for the instance of Azure KeyVault -->
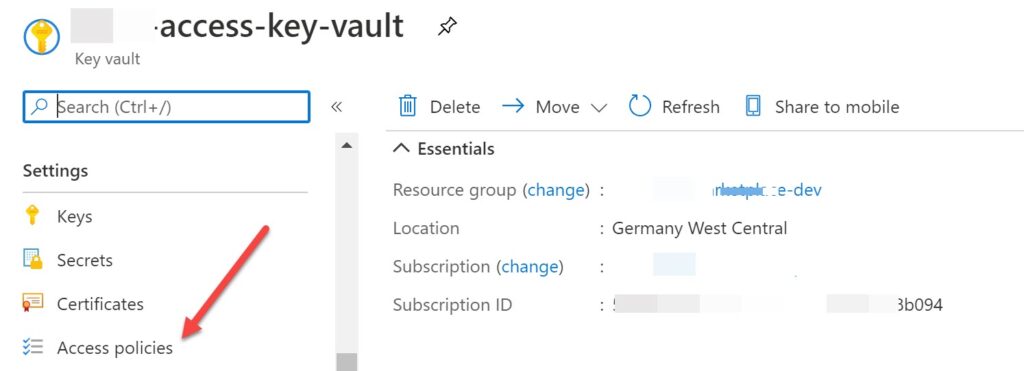
<add key="KeyVaultEndpoint" value="https://my-access-key-vault.vault.azure.net" />You need a KeyVault to store your token, and you create one by using PowerShell or using a portal. If you are following this document, and prefer using PowerShell, make sure that you run all the steps as mentioned there. For now, let’s say that you had created the KeyVault and update the key KeyVaultEndpoint with the Vault URI, you can get this value from the Overview page of the Key Vault resource.
<!-- AppID that is given access for keyvault to store the refresh tokens -->
<add key="ida:KeyVaultClientId" value="e0d59487-585f-4b90-8ce1-f5f784246218" />
This is the ID of the application that we are going to register in Azure AD. You can either create this with the PowerShell command or using the portal.
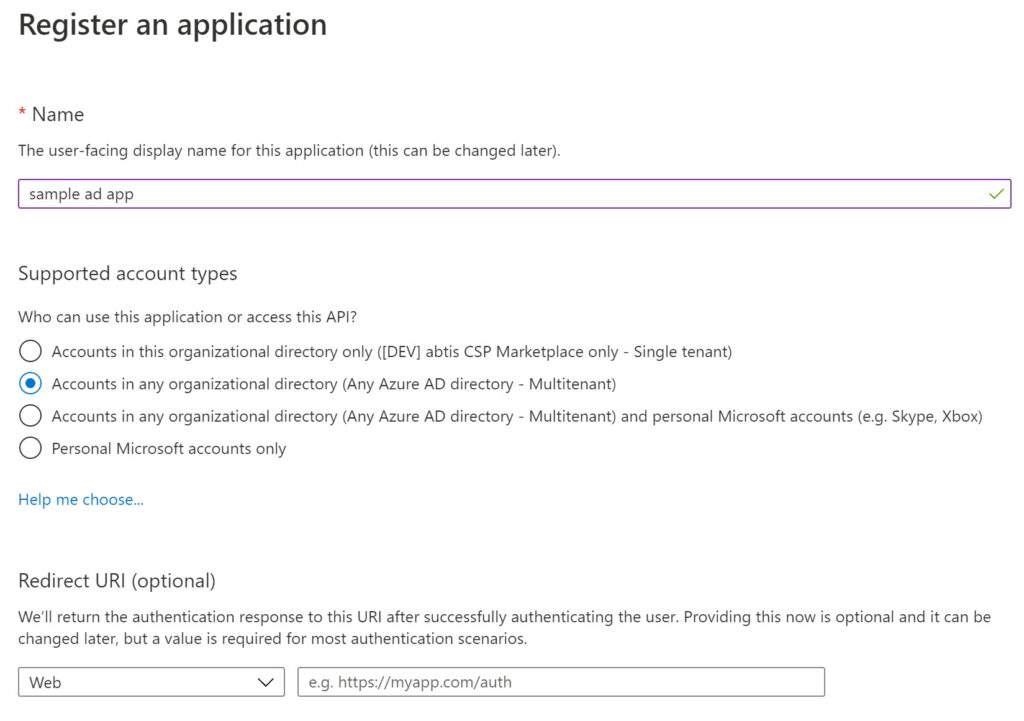
Make sure you note down the Application ID and Application Secret. If you are using the portal to create this application, go to your Azure AD and click on the App registration blade from the left-side pan and click on the +New registration. As per your requirement, select the Account Type.

Once the application is created, we need to make sure that we give access to the Key Vault we created, so that this can get/post the token to the secret in our Key Vault. Copy the application ID and go to your Azure Key Vault and click on the Access Policy from the left-side pane.

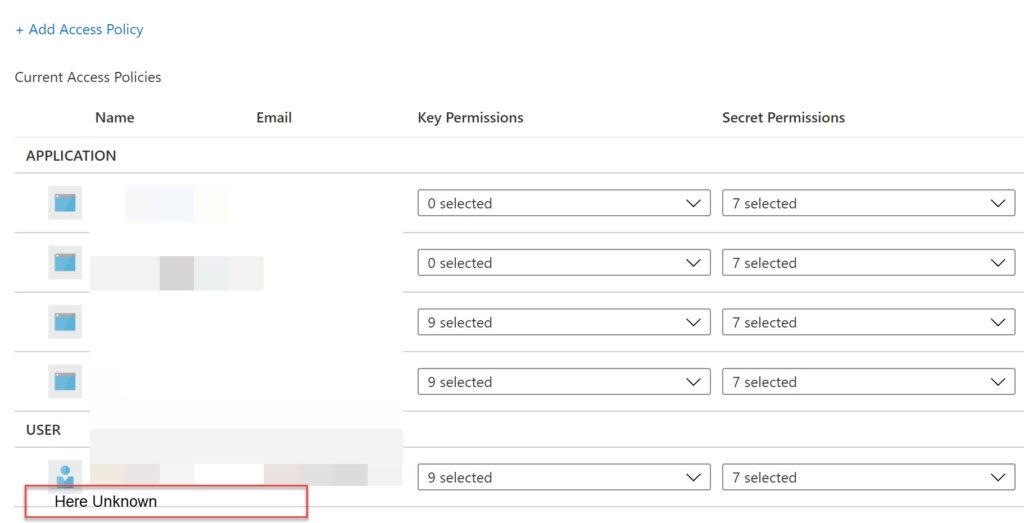
Click on the +Add policy, and then select the Secret management from the Configure from template dropdown. Now click on the link “None Selected” near the service principal, and then paste the App ID of the Azure AD application we just created in the “Select a principal” screen. Click the add button make sure you click on the Save button on the next screen. You can also do this via PowerShell by following this command.
Set-AzureRmKeyVaultAccessPolicy -VaultName access-key-vault -ObjectId 296546541096da-acc2-4576-a4a2-47654a4389e45d7 -PermissionsToSecrets get
Here the ObjectId is the object ID of your Azure AD app. Make sure that you give enough permission, otherwise, you will get an error as follows.
Operation returned an invalid status code ‘Forbidden’
at Microsoft.Azure.KeyVault.KeyVaultClient.d__63.MoveNext()
at System.Runtime.CompilerServices.TaskAwaiter.ThrowForNonSuccess(Task task)
at System.Runtime.CompilerServices.TaskAwaiter.HandleNonSuccessAndDebuggerNotification(Task task)
at System.Runtime.CompilerServices.ConfiguredTaskAwaitable1.ConfiguredTaskAwaiter.GetResult() at Microsoft.Azure.KeyVault.KeyVaultClientExtensions.<SetSecretAsync>d__46.MoveNext() at System.Runtime.CompilerServices.TaskAwaiter.ThrowForNonSuccess(Task task) at System.Runtime.CompilerServices.TaskAwaiter.HandleNonSuccessAndDebuggerNotification(Task task) at System.Runtime.CompilerServices.TaskAwaiter1.GetResult()
This is because there is no enough permission given in the access policy of our Key Vault. And also the access policy was showing as Unknown on the Access Policy page. I will be discussing this when we register our Azure AD application.

<add key="ida:KeyVaultClientSecret" value="Hewhfhu42Wz~Rs6UVna9-10.4lcdhdfh6krH-.TWK" />
You can create this secret for your Azure AD application via the portal or by using PowerShell. If you have created the AD application using the PowerShell command above, then you already have the secret value from the command Write-Host "ApplicationSecret = $($password.Value)".
Go to your Azure AD application and click on the Certificates & secrets menu from the left-side pane, and then click on the +New client secret button under the client secrets header. Copy the value and paste in the value of key “ida:KeyVaultClientSecret”. Make sure you don’t change the secret value, otherwise, you will get an error as ““error”:”invalid_client”,”error_description”:”AADSTS7000215: Invalid client secret is provided.”
If you are getting an error as “IDX10214: Audience validation failed. Audiences: ‘ceec9htdhe0d-d56564657-4472-952b’. Did not match: validationParameters.ValidAudience: ‘ceec6536463ef9a77acba5 ‘ or validationParameters.ValidAudiences: ‘null’.”, you should add ValidAudiences in the OpenIdConnectAuthenticationOptions in ConfigureAuth method.
ValidAudiences = new List<string>()
{
  "ceec9e0d-d557-6564-96542b-0ef9a6546acba5"
}
Here the audience is the ID of the Azure AD web application that we created using the Partner Center (https://partner.microsoft.com).
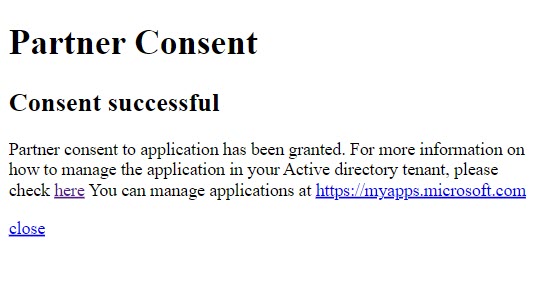
Wow, that’s it. Now you have configured your partner consent application. It is time to run our project. If you have configured everything correctly, you should get a response as follows.

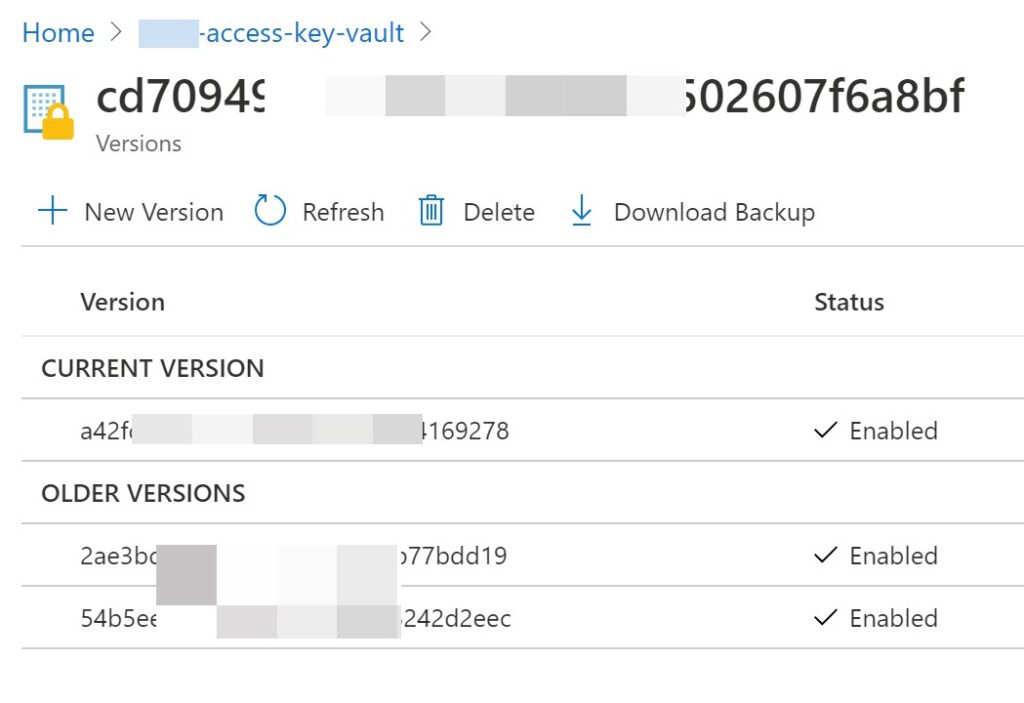
Now, if you go and check your Azure Key Vault, you can see that there is a new secret created with our access token.

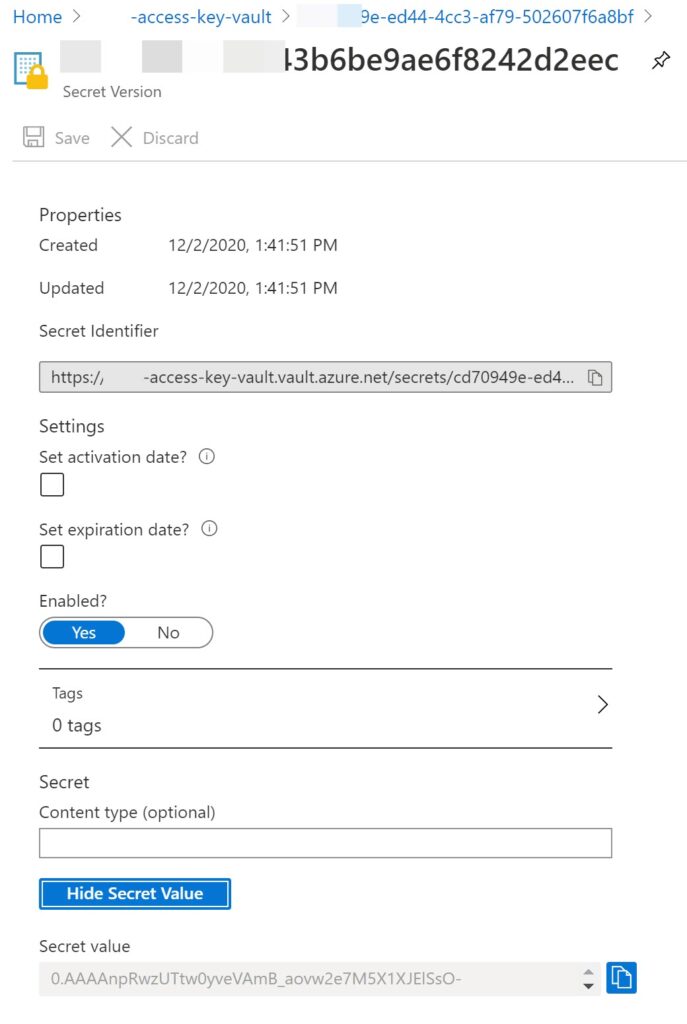
Whenever the same user login to the application again, the Token will be refreshed in the Azure Key vault with a new version.

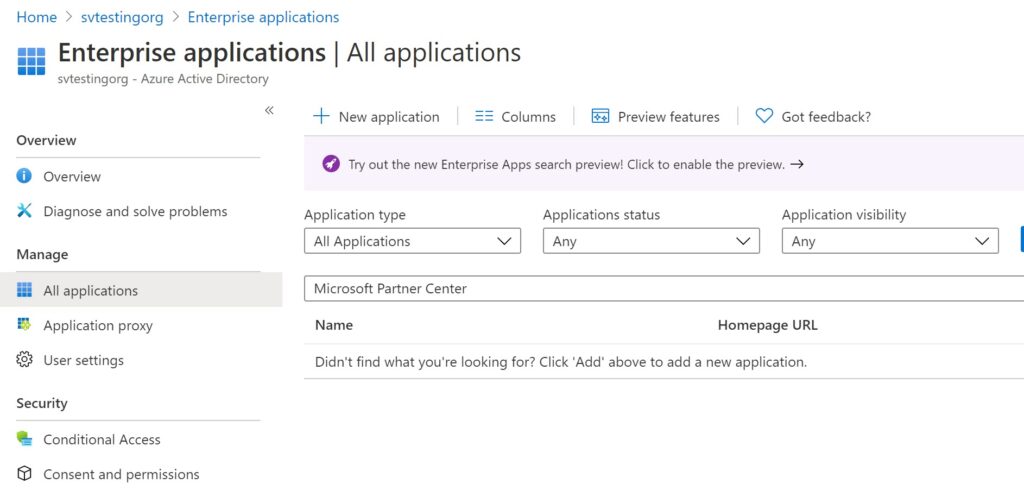
When you try with any other accounts outside of your tenant, they should be seeing a service principal of our Azure AD application in their Tenant. You can check this in the Enterprise Application page in the AD.
Please be also noted that if your Tenant Admin doesn’t grant permission to this application, you will get an error as ““error”:”invalid_grant”,”error_description”:”AADSTS65001: The user or administrator has not consented to use the application with ID“. This behavior is intended.
If you are trying to login with one of your tenants that don’t have the Partner Center App, then you will get an error as “OpenIdConnectMessage. An error was not null, indicating an error. Error: ‘access_denied’. Error_Description (may be empty): ‘AADSTS650052: The app needs access to a service (\”https://api.partnercenter.microsoft.com\”) that your organization \”50-865e-dd8763cd2cd4\” has not subscribed to or enabled. Contact your IT Admin to review the configuration of your service subscriptions.“.

This error is also intended.
Debugging Tips
While working with this application, I was getting a lot of errors, and the sad part was that the application was not throwing any errors, so I had to go place the debugger in almost all the places I could. And some errors were not having enough information too. To get detailed error information, I had to set “IdentityModelEventSource.ShowPII = true” in the COnfigureAuth method in the Startup.Auth.cs file. You should install the Nuget package “Microsoft.IdentityModel.Logging” to use this feature.
After that, I was getting detailed errors and I was just fixing errors one by one. And it took me quite a lot of time to make this application working, and that is the reason why I write this post.
When you try with other accounts, make sure that MFA is configured for that account.
Conclusion
Congratulations and thanks a lot for being with me this far. We now have a sample web application that has access to Azure AD, Partner Center, Azure Key Vault, and does the Authentication against a user. Please do not forget to share this post if you find it is useful. Happy Coding!.
About the Author
I am yet another developer who is passionate about writing and video creation. I have written close to 500 blogs on my blog. And I upload videos on my YouTube channels Njan Oru Malayali and Sibeesh Passion. Please feel free to follow me.
Your turn. What do you think?
Thanks a lot for reading. Did I miss anything that you may think is needed in this article? Could you find this post useful? Kindly do not forget to share your feedback.
Kindest Regards
Sibeesh Venu