Advanced JQX Grid With All Functionality
In this article we will see how we can implement or create a JQWidget’s JQX grid in our application. It is a client side grid which is good in performance and speed. We will see the advanced properties of a JQWidget JQX gris in this article.
This article has been selected as Asp.Net Community Article of the Day Sunday January 11 ,2015.
If you are new to the term JQX Grid then please find out the articles related to JQWidget category here: http://sibeeshpassion.com/category/products/jqwidgets/
If you need to bind the data source dynamically, please read here: http://sibeeshpassion.com/Convert-CellSet-to-HTML-table-And-From-HTML-To-Json-To-Array. For the past days I have been working on JQX Grid. Now I will share that Grid with all the functionality.
Download the source code
Background
In my previous article, one member asked for some functionality. So I thought of sharing that info. Please note that I have not implemented all the functionalities. I have selected some important features that we may use in our programming life.
Using the code
As we discussed in the previous articles, we need a web application with all the contents of JQX Widgets (http://sibeeshpassion.com/working-with-jqx-grid-with-filtering-and-sorting/ ).
What is JQX Grid?
jqxGrid is powerful datagrid widget built entirely with open web standards. It offers rich functionality, easy to use APIs and works across devices and browsers. jqxGrid delivers advanced data visualization features and built-in support for client and server-side paging, editing, sorting and filtering.
What we need?
Simple HTML
[html]
<!DOCTYPE html>
<html lang=“en”>
<head>
<title></title>
</head>
<body>
</body>
</html>
[/html]
Include the extra UI elements
[html]
<body class=‘default’>
<div id=‘jqxWidget’ style=“font-size: 13px; font-family: Verdana; float: left;”>
<div id=“jqxgrid”></div>
<div style=‘margin-top: 20px;’>
<div style=‘float: left;’>
<input type=“button” value=“Export to Excel” id=‘excelExport’ />
<br /><br />
<input type=“button” value=“Export to XML” id=‘xmlExport’ />
</div>
<div style=‘margin-left: 10px; float: left;’>
<input type=“button” value=“Export to CSV” id=‘csvExport’ />
<br /><br />
<input type=“button” value=“Export to TSV” id=‘tsvExport’ />
</div>
<div style=‘margin-left: 10px; float: left;’>
<input type=“button” value=“Export to HTML” id=‘htmlExport’ />
<br /><br />
<input type=“button” value=“Export to JSON” id=‘jsonExport’ />
</div>
<div style=‘margin-left: 10px; float: left;’>
<input type=“button” value=“Print” id=‘print’ />
</div>
</div>
</div>
</body>
[/html]
Include Reference
[html]
<link rel=“stylesheet” href=“jqwidgets/styles/jqx.base.css” type=“text/css” />
<script type=“text/javascript” src=“scripts/jquery-1.11.1.min.js”></script>
<script type=“text/javascript” src=“jqwidgets/jqxcore.js”></script>
<script type=“text/javascript” src=“jqwidgets/jqxdata.js”></script>
<script type=“text/javascript” src=“jqwidgets/jqxbuttons.js”></script>
<script type=“text/javascript” src=“jqwidgets/jqxscrollbar.js”></script>
<script type=“text/javascript” src=“jqwidgets/jqxlistbox.js”></script>
<script type=“text/javascript” src=“jqwidgets/jqxdropdownlist.js”></script>
<script type=“text/javascript” src=“jqwidgets/jqxmenu.js”></script>
<script type=“text/javascript” src=“jqwidgets/jqxgrid.js”></script>
<script type=“text/javascript” src=“jqwidgets/jqxgrid.filter.js”></script>
<script type=“text/javascript” src=“jqwidgets/jqxgrid.sort.js”></script>
<script type=“text/javascript” src=“jqwidgets/jqxgrid.selection.js”></script>
<script type=“text/javascript” src=“jqwidgets/jqxpanel.js”></script>
<script type=“text/javascript” src=“jqwidgets/jqxcheckbox.js”></script>
<script type=“text/javascript” src=“scripts/demos.js”></script>
<script src=“jqwidgets/jqxgrid.pager.js” type=“text/javascript”></script>
<script src=“jqwidgets/jqxgrid.edit.js” type=“text/javascript”></script>
<script src=“jqwidgets/jqxgrid.columnsresize.js” type=“text/javascript”></script>
<script src=“jqwidgets/jqxgrid.columnsreorder.js” type=“text/javascript”></script>
<script src=“jqwidgets/jqxgrid.export.js” type=“text/javascript”></script>
<script src=“jqwidgets/jqxdata.export.js” type=“text/javascript”></script>
[/html]
What we add new?
[js]
<script src=“jqwidgets/jqxgrid.pager.js” type=“text/javascript”></script>
[/js]
This script is for adding the functionality of Paging :). You can add the functionality to the grid as
[js]
pageable: true.
[/js]
And if you want different stylish paging then you can set that like this:
[js]
pagermode: ‘simple’,
[/js]
[js]
<script src=“jqwidgets/jqxgrid.edit.js” type=“text/javascript”></script>
[/js]
This script is for adding the functionality of Editing :). You can add the functionality to the grid as
[js]
editable: true.
[/js]
[js]
<script src=“jqwidgets/jqxgrid.columnsresize.js” type=“text/javascript”></script>
<script src=“jqwidgets/jqxgrid.columnsreorder.js” type=“text/javascript”></script>
[/js]
These scripts are for adding the functionality of Hierarchy columns. If we want to separate the data in the column header then you can include the following scripts.
[js]
<script src=“jqwidgets/jqxgrid.export.js” type=“text/javascript”></script>
<script src=“jqwidgets/jqxdata.export.js” type=“text/javascript”></script>
[/js]
When you want to export your grid to any formate, please include those scripts. You can implement the same just like the following:
[js]
$(“#excelExport”).jqxButton({ theme: theme }); //Assign styles to the button
$(“#xmlExport”).jqxButton({ theme: theme });
$(“#csvExport”).jqxButton({ theme: theme });
$(“#tsvExport”).jqxButton({ theme: theme });
$(“#htmlExport”).jqxButton({ theme: theme });
$(“#jsonExport”).jqxButton({ theme: theme });
$(“#excelExport”).click(function () {
$(“#jqxgrid”).jqxGrid(‘exportdata’, ‘xls’, ‘jqxGrid’); // To export to xlx
});
$(“#xmlExport”).click(function () {
$(“#jqxgrid”).jqxGrid(‘exportdata’, ‘xml’, ‘jqxGrid’); //To export to XML
});
$(“#csvExport”).click(function () {
$(“#jqxgrid”).jqxGrid(‘exportdata’, ‘csv’, ‘jqxGrid’); // To export to csv
});
$(“#tsvExport”).click(function () {
$(“#jqxgrid”).jqxGrid(‘exportdata’, ‘tsv’, ‘jqxGrid’); // To export to tsv
});
$(“#htmlExport”).click(function () {
$(“#jqxgrid”).jqxGrid(‘exportdata’, ‘html’, ‘jqxGrid’); // To export to html
});
$(“#jsonExport”).click(function () {
$(“#jqxgrid”).jqxGrid(‘exportdata’, ‘json’, ‘jqxGrid’); // To export to JSON
});
[/js]
If you want to print your grid:
[js]
$(“#print”).jqxButton();
$(“#print”).click(function () {
var gridContent = $(“#jqxgrid”).jqxGrid(‘exportdata’, ‘html’);
var newWindow = window.open(”, ”, ‘width=800, height=500′),
document = newWindow.document.open(),
pageContent =
‘<!DOCTYPE html>\n’ +
‘<html>\n’ +
‘<head>\n’ +
‘<meta charset=”utf-8″ />\n’ +
‘<title>jQWidgets Grid</title>\n’ +
‘</head>\n’ +
‘<body>\n’ + gridContent + ‘\n</body>\n</html>’;
document.write(pageContent);
document.close();
newWindow.print();
});
[/js]
Now we need data to populate the grid, right? Since we are familiar with a simple header JQX Grid from the previous article, now we can go for a hierarchy column grid. So let’s say we have XML as follows:
[xml]
<DATA>
<ROW>
<ProductID>72</ProductID>
<SupplierName>Formaggi Fortini s.r.l.</SupplierName>
<Quantity>24 – 200 g pkgs.</Quantity>
<Freight>32.3800</Freight>
<OrderDate>1996-07-04 00:00:00</OrderDate>
<OrderAddress>59 rue de l-Abbaye</OrderAddress>
<Price>34.8000</Price>
<City>Ravenna</City>
<Address>Viale Dante, 75</Address>
<ProductName>Mozzarella di Giovanni</ProductName>
</ROW>
<ROW>
<ProductID>42</ProductID>
<SupplierName>Leka Trading</SupplierName>
<Quantity>32 – 1 kg pkgs.</Quantity>
<Freight>32.3800</Freight>
<OrderDate>1996-07-04 00:00:00</OrderDate>
<OrderAddress>59 rue de l-Abbaye</OrderAddress>
<Price>14.0000</Price>
<City>Singapore</City>
<Address>471 Serangoon Loop, Suite #402</Address>
<ProductName>Singaporean Hokkien Fried Mee</ProductName>
</ROW>
<ROW>
……..
</ROW>
<ROW>
……..
</ROW>
</DATA>
[/xml]
Please find the orderdetailsextended.xml from the source.
Implementing a JQX GRid with advanced features
[js]
<script type=“text/javascript”>
$(document).ready(function () {
// prepare the data
var source =
{
datatype: “xml”,
datafields: [
{ name: ‘SupplierName’, type: ‘string’ },
{ name: ‘Quantity’, type: ‘number’ },
{ name: ‘OrderDate’, type: ‘date’ },
{ name: ‘OrderAddress’, type: ‘string’ },
{ name: ‘Freight’, type: ‘number’ },
{ name: ‘Price’, type: ‘number’ },
{ name: ‘City’, type: ‘string’ },
{ name: ‘ProductName’, type: ‘string’ },
{ name: ‘Address’, type: ‘string’ }
],
url: ‘orderdetailsextended.xml’,
root: ‘DATA’,
record: ‘ROW’
};
var dataAdapter = new $.jqx.dataAdapter(source, {
loadComplete: function () {
}
});
// create jqxgrid.
$(“#jqxgrid”).jqxGrid(
{
width: 900,
source: dataAdapter,
filterable: true,
sortable: true,
pageable: true,
autorowheight: true,
altrows: true,
columnsresize: true,
columns: [
{ text: ‘Supplier Name’, cellsalign: ‘center’, align: ‘center’, datafield: ‘SupplierName’, width: 110 },
{ text: ‘Name’, columngroup: ‘ProductDetails’, cellsalign: ‘center’, align: ‘center’, datafield: ‘ProductName’, width: 120 },
{ text: ‘Quantity’, columngroup: ‘ProductDetails’, datafield: ‘Quantity’, cellsformat: ‘d’, cellsalign: ‘center’, align: ‘center’, width: 80 },
{ text: ‘Freight’, columngroup: ‘OrderDetails’, datafield: ‘Freight’, cellsformat: ‘d’, cellsalign: ‘center’, align: ‘center’, width: 100 },
{ text: ‘Order Date’, columngroup: ‘OrderDetails’, cellsalign: ‘center’, align: ‘center’, cellsformat: ‘d’, datafield: ‘OrderDate’, width: 100 },
{ text: ‘Order Address’, columngroup: ‘OrderDetails’, cellsalign: ‘center’, align: ‘center’, datafield: ‘OrderAddress’, width: 100 },
{ text: ‘Price’, columngroup: ‘ProductDetails’, datafield: ‘Price’, cellsformat: ‘c2′, align: ‘center’, cellsalign: ‘center’, width: 70 },
{ text: ‘Address’, columngroup: ‘Location’, cellsalign: ‘center’, align: ‘center’, datafield: ‘Address’, width: 120 },
{ text: ‘City’, columngroup: ‘Location’, cellsalign: ‘center’, align: ‘center’, datafield: ‘City’, width: 80 }
],
columngroups:
[
{ text: ‘Product Details’, align: ‘center’, name: ‘ProductDetails’ },
{ text: ‘Order Details’, parentgroup: ‘ProductDetails’, align: ‘center’, name: ‘OrderDetails’ },
{ text: ‘Location’, align: ‘center’, name: ‘Location’ }
]
});
$(“#excelExport”).jqxButton({ theme: theme });
$(“#xmlExport”).jqxButton({ theme: theme });
$(“#csvExport”).jqxButton({ theme: theme });
$(“#tsvExport”).jqxButton({ theme: theme });
$(“#htmlExport”).jqxButton({ theme: theme });
$(“#jsonExport”).jqxButton({ theme: theme });
$(“#excelExport”).click(function () {
$(“#jqxgrid”).jqxGrid(‘exportdata’, ‘xls’, ‘jqxGrid’);
});
$(“#xmlExport”).click(function () {
$(“#jqxgrid”).jqxGrid(‘exportdata’, ‘xml’, ‘jqxGrid’);
});
$(“#csvExport”).click(function () {
$(“#jqxgrid”).jqxGrid(‘exportdata’, ‘csv’, ‘jqxGrid’);
});
$(“#tsvExport”).click(function () {
$(“#jqxgrid”).jqxGrid(‘exportdata’, ‘tsv’, ‘jqxGrid’);
});
$(“#htmlExport”).click(function () {
$(“#jqxgrid”).jqxGrid(‘exportdata’, ‘html’, ‘jqxGrid’);
});
$(“#jsonExport”).click(function () {
$(“#jqxgrid”).jqxGrid(‘exportdata’, ‘json’, ‘jqxGrid’);
});
$(“#print”).jqxButton();
$(“#print”).click(function () {
var gridContent = $(“#jqxgrid”).jqxGrid(‘exportdata’, ‘html’);
var newWindow = window.open(”, ”, ‘width=800, height=500′),
document = newWindow.document.open(),
pageContent =
‘<!DOCTYPE html>\n’ +
‘<html>\n’ +
‘<head>\n’ +
‘<meta charset=”utf-8″ />\n’ +
‘<title>jQWidgets Grid</title>\n’ +
‘</head>\n’ +
‘<body>\n’ + gridContent + ‘\n</body>\n</html>’;
document.write(pageContent);
document.close();
newWindow.print();
});
});
</script>
[/js]
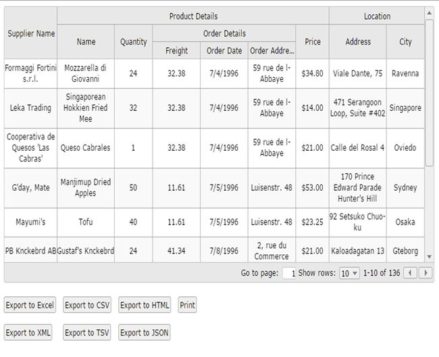
In the preceding script you can see a code part as follows:
[js]
columngroups:
[
{ text: ‘Product Details’, align: ‘center’, name: ‘ProductDetails’ },
{ text: ‘Order Details’, parentgroup: ‘ProductDetails’, align: ‘center’, name: ‘OrderDetails’ },
{ text: ‘Location’, align: ‘center’, name: ‘Location’ }
]
[/js]
This is where the column grouping is happening. And if you want to add a column under this column you can set that as follows:
[js]
{ text: ‘Name’, columngroup: ‘ProductDetails’, cellsalign: ‘center’, align: ‘center’, datafield: ‘ProductName’, width: 120 }
[/js]
You can specify this as needed and your data source.Now this is how our page looks like.
[html]
<!DOCTYPE html>
<html lang=“en”>
<head>
<title></title>
<link rel=“stylesheet” href=“jqwidgets/styles/jqx.base.css” type=“text/css” />
<script type=“text/javascript” src=“scripts/jquery-1.11.1.min.js”></script>
<script type=“text/javascript” src=“jqwidgets/jqxcore.js”></script>
<script type=“text/javascript” src=“jqwidgets/jqxdata.js”></script>
<script type=“text/javascript” src=“jqwidgets/jqxbuttons.js”></script>
<script type=“text/javascript” src=“jqwidgets/jqxscrollbar.js”></script>
<script type=“text/javascript” src=“jqwidgets/jqxlistbox.js”></script>
<script type=“text/javascript” src=“jqwidgets/jqxdropdownlist.js”></script>
<script type=“text/javascript” src=“jqwidgets/jqxmenu.js”></script>
<script type=“text/javascript” src=“jqwidgets/jqxgrid.js”></script>
<script type=“text/javascript” src=“jqwidgets/jqxgrid.filter.js”></script>
<script type=“text/javascript” src=“jqwidgets/jqxgrid.sort.js”></script>
<script type=“text/javascript” src=“jqwidgets/jqxgrid.selection.js”></script>
<script type=“text/javascript” src=“jqwidgets/jqxpanel.js”></script>
<script type=“text/javascript” src=“jqwidgets/jqxcheckbox.js”></script>
<script type=“text/javascript” src=“scripts/demos.js”></script>
<script src=“generatedata.js” type=“text/javascript”></script>
<script src=“jqwidgets/jqxgrid.pager.js” type=“text/javascript”></script>
<script src=“jqwidgets/jqxgrid.edit.js” type=“text/javascript”></script>
<script src=“jqwidgets/jqxgrid.columnsresize.js” type=“text/javascript”></script>
<script src=“jqwidgets/jqxgrid.columnsreorder.js” type=“text/javascript”></script>
<script src=“jqwidgets/jqxgrid.export.js” type=“text/javascript”></script>
<script src=“jqwidgets/jqxdata.export.js” type=“text/javascript”></script>
<script type=“text/javascript”>
$(document).ready(function () {
// prepare the data
var source =
{
datatype: “xml”,
datafields: [
{ name: ‘SupplierName’, type: ‘string’ },
{ name: ‘Quantity’, type: ‘number’ },
{ name: ‘OrderDate’, type: ‘date’ },
{ name: ‘OrderAddress’, type: ‘string’ },
{ name: ‘Freight’, type: ‘number’ },
{ name: ‘Price’, type: ‘number’ },
{ name: ‘City’, type: ‘string’ },
{ name: ‘ProductName’, type: ‘string’ },
{ name: ‘Address’, type: ‘string’ }
],
url: ‘orderdetailsextended.xml’,
root: ‘DATA’,
record: ‘ROW’
};
var dataAdapter = new $.jqx.dataAdapter(source, {
loadComplete: function () {
}
});
// create jqxgrid.
$(“#jqxgrid”).jqxGrid(
{
width: 900,
source: dataAdapter,
filterable: true,
sortable: true,
pageable: true,
autorowheight: true,
altrows: true,
columnsresize: true,
columns: [
{ text: ‘Supplier Name’, cellsalign: ‘center’, align: ‘center’, datafield: ‘SupplierName’, width: 110 },
{ text: ‘Name’, columngroup: ‘ProductDetails’, cellsalign: ‘center’, align: ‘center’, datafield: ‘ProductName’, width: 120 },
{ text: ‘Quantity’, columngroup: ‘ProductDetails’, datafield: ‘Quantity’, cellsformat: ‘d’, cellsalign: ‘center’, align: ‘center’, width: 80 },
{ text: ‘Freight’, columngroup: ‘OrderDetails’, datafield: ‘Freight’, cellsformat: ‘d’, cellsalign: ‘center’, align: ‘center’, width: 100 },
{ text: ‘Order Date’, columngroup: ‘OrderDetails’, cellsalign: ‘center’, align: ‘center’, cellsformat: ‘d’, datafield: ‘OrderDate’, width: 100 },
{ text: ‘Order Address’, columngroup: ‘OrderDetails’, cellsalign: ‘center’, align: ‘center’, datafield: ‘OrderAddress’, width: 100 },
{ text: ‘Price’, columngroup: ‘ProductDetails’, datafield: ‘Price’, cellsformat: ‘c2′, align: ‘center’, cellsalign: ‘center’, width: 70 },
{ text: ‘Address’, columngroup: ‘Location’, cellsalign: ‘center’, align: ‘center’, datafield: ‘Address’, width: 120 },
{ text: ‘City’, columngroup: ‘Location’, cellsalign: ‘center’, align: ‘center’, datafield: ‘City’, width: 80 }
],
columngroups:
[
{ text: ‘Product Details’, align: ‘center’, name: ‘ProductDetails’ },
{ text: ‘Order Details’, parentgroup: ‘ProductDetails’, align: ‘center’, name: ‘OrderDetails’ },
{ text: ‘Location’, align: ‘center’, name: ‘Location’ }
]
});
$(“#excelExport”).jqxButton({ theme: theme });
$(“#xmlExport”).jqxButton({ theme: theme });
$(“#csvExport”).jqxButton({ theme: theme });
$(“#tsvExport”).jqxButton({ theme: theme });
$(“#htmlExport”).jqxButton({ theme: theme });
$(“#jsonExport”).jqxButton({ theme: theme });
$(“#excelExport”).click(function () {
$(“#jqxgrid”).jqxGrid(‘exportdata’, ‘xls’, ‘jqxGrid’);
});
$(“#xmlExport”).click(function () {
$(“#jqxgrid”).jqxGrid(‘exportdata’, ‘xml’, ‘jqxGrid’);
});
$(“#csvExport”).click(function () {
$(“#jqxgrid”).jqxGrid(‘exportdata’, ‘csv’, ‘jqxGrid’);
});
$(“#tsvExport”).click(function () {
$(“#jqxgrid”).jqxGrid(‘exportdata’, ‘tsv’, ‘jqxGrid’);
});
$(“#htmlExport”).click(function () {
$(“#jqxgrid”).jqxGrid(‘exportdata’, ‘html’, ‘jqxGrid’);
});
$(“#jsonExport”).click(function () {
$(“#jqxgrid”).jqxGrid(‘exportdata’, ‘json’, ‘jqxGrid’);
});
$(“#print”).jqxButton();
$(“#print”).click(function () {
var gridContent = $(“#jqxgrid”).jqxGrid(‘exportdata’, ‘html’);
var newWindow = window.open(”, ”, ‘width=800, height=500′),
document = newWindow.document.open(),
pageContent =
‘<!DOCTYPE html>\n’ +
‘<html>\n’ +
‘<head>\n’ +
‘<meta charset=”utf-8″ />\n’ +
‘<title>jQWidgets Grid</title>\n’ +
‘</head>\n’ +
‘<body>\n’ + gridContent + ‘\n</body>\n</html>’;
document.write(pageContent);
document.close();
newWindow.print();
});
});
</script>
</head>
<body class=‘default’>
<div id=‘jqxWidget’ style=“font-size: 13px; font-family: Verdana; float: left;”>
<div id=“jqxgrid”></div>
<div style=‘margin-top: 20px;’>
<div style=‘float: left;’>
<input type=“button” value=“Export to Excel” id=‘excelExport’ />
<br /><br />
<input type=“button” value=“Export to XML” id=‘xmlExport’ />
</div>
<div style=‘margin-left: 10px; float: left;’>
<input type=“button” value=“Export to CSV” id=‘csvExport’ />
<br /><br />
<input type=“button” value=“Export to TSV” id=‘tsvExport’ />
</div>
<div style=‘margin-left: 10px; float: left;’>
<input type=“button” value=“Export to HTML” id=‘htmlExport’ />
<br /><br />
<input type=“button” value=“Export to JSON” id=‘jsonExport’ />
</div>
<div style=‘margin-left: 10px; float: left;’>
<input type=“button” value=“Print” id=‘print’ />
</div>
</div>
</div>
</body>
</html>
[/html]
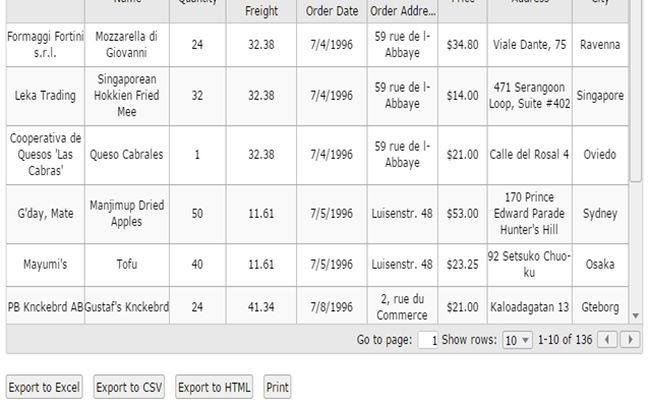
That is all. We have successfully created a wonderful JQX Grid as in the following:
Advanced JQX Grid With All Functionality
Advanced JQX Grid With All Functionality
Advanced JQX Grid With All Functionality
Now you may think, why are those export buttons outside? It looks different, right? Now we can work on it. In the JQX Grid there is an option called showtoolbar, by setting this to true we can have a toolbar along with the grid. There we can bind all of these buttons if you want. So shall we start?
[js]
showtoolbar: true,
[/js]
Add that line to your JQX grid implementation. Next we need to append the UI elements to the tool bar, right?
[js]
rendertoolbar:function (toolbar) {
var me = this;
var container = $(“<div ></div>”);
var input = $(‘<div id=”excelExport” style=”background-color: #555555;float: left; font-
weight: bold;line-height: 28px; min-
width: 80px;padding: 3px 5px 3px 10px;color: #fff; “>Excel</div>
div style=”background-color: #555555;float: left; font-weight: bold;line-
height: 28px; min-width: 80px;padding: 3px 5px 3px 10px;color: #fff; margin-
left: 3px;” id=”print” >Print</div></div>’);
toolbar.append(container);
container.append(input);
}
[/js]
Add the preceding function also. 🙂 Now this is how your JQX Grid Implementation must be:
[js]
$(“#jqxgrid”).jqxGrid(
{
width: 900,
source: dataAdapter,
filterable: true,
sortable: true,
pageable: true,
autorowheight: true,
altrows: true,
columnsresize: true,
showtoolbar: true,
rendertoolbar: function (toolbar) {
var me = this;
var container = $(“<div ></div>”);
var input = $(‘<div id=”div1″ style=”background-color: #555555;float: left; font-weight: bold;line-
height: 28px; min-width: 80px;padding: 3px 5px 3px 10px;color: #fff; “>Your First Div</div>
<div style=”background-color: #555555;float: left; font-weight: bold;line-height: 28px; min-
width: 80px;padding: 3px 5px 3px 10px;color: #fff; margin-
left: 3px;” id=”Div2″ >Your Second Div</div></div>’);
toolbar.append(container);
container.append(input);
},
columns: [
{ text: ‘Supplier Name’, cellsalign: ‘center’, align: ‘center’, datafield: ‘SupplierName’, width: 110 },
{ text: ‘Name’, columngroup: ‘ProductDetails’, cellsalign: ‘center’, align: ‘center’, datafield: ‘ProductName’
, width: 120 },
{ text: ‘Quantity’, columngroup: ‘ProductDetails’, datafield: ‘Quantity’, cellsformat: ‘d’, cellsalign: ‘cente
r’, align: ‘center’, width: 80 },
{ text: ‘Freight’, columngroup: ‘OrderDetails’, datafield: ‘Freight’, cellsformat: ‘d’, cellsalign: ‘center’,
align: ‘center’, width: 100 },
{ text: ‘Order Date’, columngroup: ‘OrderDetails’, cellsalign: ‘center’, align: ‘center’, cellsformat: ‘d’, da
tafield: ‘OrderDate’, width: 100 },
{ text: ‘Order Address’, columngroup: ‘OrderDetails’, cellsalign: ‘center’, align: ‘center’, datafield: ‘Order
Address’, width: 100 },
{ text: ‘Price’, columngroup: ‘ProductDetails’, datafield: ‘Price’, cellsformat: ‘c2′, align: ‘center’, cellsa
lign: ‘center’, width: 70 },
{ text: ‘Address’, columngroup: ‘Location’, cellsalign: ‘center’, align: ‘center’, datafield: ‘Address’, width
: 120 },
{ text: ‘City’, columngroup: ‘Location’, cellsalign: ‘center’, align: ‘center’, datafield: ‘City’, width: 80 }
],
columngroups: [
{ text: ‘Product Details’, align: ‘center’, name: ‘ProductDetails’ },
{ text: ‘Order Details’, parentgroup: ‘ProductDetails’, align: ‘center’, name: ‘OrderDetails’ },
{ text: ‘Location’, align: ‘center’, name: ‘Location’ }
]
});
[/js]
Now your output looks like the following:
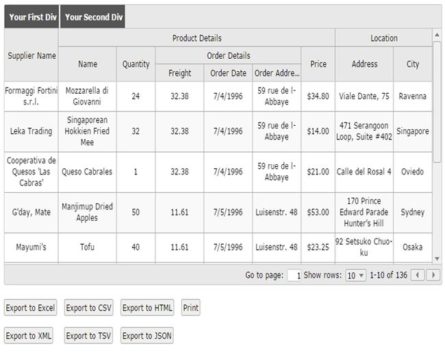
Advanced JQX Grid With All Functionality
What if you want to share this Grid with your friends? For that we have a jQuery share pluggin, Minimal jQuery Plugin For Social Share Buttons – Sharer.
Include the following files from the downloded rar from the preceding link
[js]
<link href=“styles/jquery.sharer.css” rel=“stylesheet” type=“text/css” />
<script src=“scripts/jquery.sharer.js” type=“text/javascript”></script>
[/js]
Include the script to your page
[js]
$(“.social-buttons”).sharer();
[/js]
Add a div where you can see the share buttons
[js]
<div class=“social-buttons” style=“position: relative;z-index: 1000;”></div>
[/js]
Well, that’s all; you have now done everything. We can now see the page as,
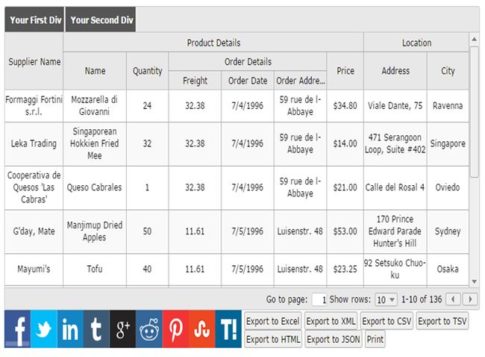
Advanced JQX Grid With All Functionality
To set the page size add the following line to your grid settings:
[js]
pagesize: 50,
[/js]
To set the custom pagesize options add the following line to your grid settings:
[js]
pagesizeoptions: [‘5′,’10’,’15’,’20’,’30’,’40’,’50’],
[/js]
To allow resizing of the columns add the following line to your grid settings:
[js]
columnsresize: true,
[/js]
To allow column re-ordering options add the following line to your grid settings:
[js]
columnsreorder: true,
[/js]
Be sure that you added the jqxgrid.columnsreorder.js JavaScript file.
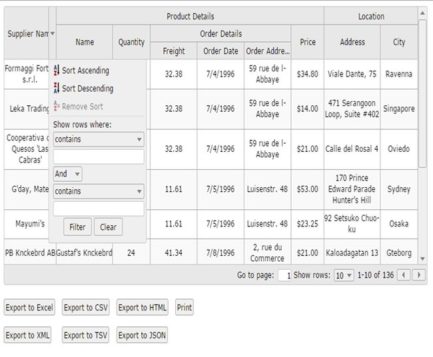
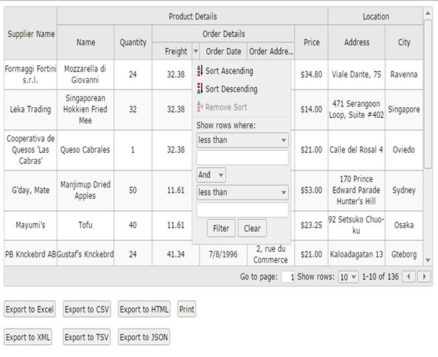
To allow an Excel-like filter add the following line to your grid settings:
[js]
filtermode: ‘excel’,
[/js]
Then you will get a filtering option as follows:
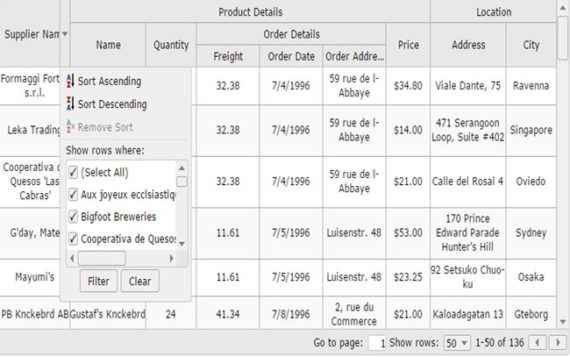
Advanced JQX Grid With All Functionality
To enable the tooltip add the following line to your grid settings
[js]
enabletooltips: true,
[/js]
To apply themes add the following line to your grid settings
[js]
theme: ‘metro’,
[/js]
Please be noted that you must include the style sheet accordingly, In this case you have to include the following
[html]
<link href=“~/jqwidgets/styles/jqx.metro.css” rel=“stylesheet” />
[/html]
You can find so many CSS in jqwidgets/styles folder.
To enable auto height add the following line to your grid settings
[js]
autoheight: true,
[/js]
To show the default filter icon always add the following line to your grid settings
[js]
autoshowfiltericon: false,
[/js]
Happy Coding 🙂
History
First Version: 20-Oct-2014
Second Version: 23-Oct-2014
Conclusion
Did I miss anything that you may think which is needed? Could you find this post as useful? I hope you liked this article. Please share me your valuable suggestions and feedback.
Your turn. What do you think?
A blog isn’t a blog without comments, but do try to stay on topic. If you have a question unrelated to this post, you’re better off posting it on C# Corner, Code Project, Stack Overflow, Asp.Net Forum instead of commenting here. Tweet or email me a link to your question there and I’ll definitely try to help if I can.
Kindest Regards
Sibeesh Venu