Raspberry PI SD Card Provisioning with Windows 10 IoT Core – Adding Packages to the Existing FFU Image
[toc]
Introduction
In my previous article, we have seen how to create a basic FFU image which can be flashed to SD cards. Today, we will see how we can package our application and add this to our existing IoT Core OS image. Doesn’t it sound good? If you haven’t read my previous articles on the same topic, I strongly recommend you to read so that we can make sure that we both are in the same boat. For now, let’s just start doing some amazing things. Let’s just start then.
Background
Wow, that’s cool that you have your own FFU image in your SD card now, to make it more custom you may need to add your own application to it so that the same can be run in as many Raspberry Pi device as can, well that’s called Provisioning right? In this article,
- we will see how we can create an APPX package of a UWP application
- how the APPX package can be added to our FFU image
Let’s start doing the PowerShell commands now then.
Prerequisites
To do the wonderful things, we always need some prerequisites. You can always see all the prerequisites from here. But, in this part, we are going to be needed only the preceding tools.
- Windows Assessment and Deployment Kit (Windows ADK)
- Windows Driver Kit (WDK) 10
- IoT Core ADK Add-Ons
- Windows 10 IoT Core Packages
- The Raspberry Pi BSP
- Custom FFU image we have created
Creating the UWP APPX
For now, I am going to use the Microsoft HelloWorld application, which is already available in the GitHub. Let’s just clone that application and build the same. If you are getting an error as “Error Cannot resolve Assembly or Windows Metadata file ‘Windows.Foundation.UniversalApiContract.winmd'”, please make sure that you had set the target version in the application section, you can always see my detailed answer here in StackOverflow.
Now let’s just right click on the project and click on Store – > Create App Packages.
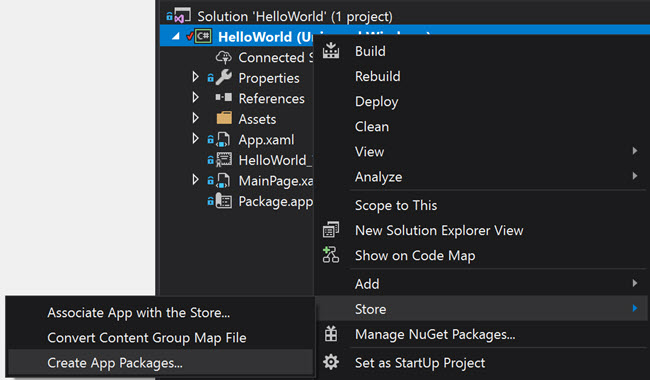
Create APPX Menu
Now select the option “I want to create packages for sideloading” and click next. In the next screen, you can always automatically increment your application version. In the Generate app bundle option, select Never. And click Create. Now the app will get built and the APPX file will be generated for you.

Create APP Package
Adding APPX to the Existing FFU
As we have our own package and FFU image ready, we can go ahead and add this package to our FFU now. To do that open the IoTCorePShell, if you are not sure about how to open this, please check my previous article. Now let’s create a package for our app.
newappxpkg "C:\Users\SibeeshVenu\source\repos\Windows-iotcore-samples.git\Samples\HelloWorld\CS\AppPackages\HelloWorld_1.0.0.0_ARM_Test\HelloWorld_1.0.0.0_ARM.appx" fga Appx.HelloWorld
Please be noted that the “fga” is an indication that your application is a foreground application, if your application is a background application, you should use “bgt” instead of “fga”.
Please make sure that your FFU image has at least one Foreground application in it. You will always see the blue spinning dots after connecting the monitor to the Raspberry Pi if you have only background application in your image. So you should consider having a registered fgt as well in your image.
You will not be able to understand what exactly happens if there any problems if you have only a background application in your image. Trust me, I had spent many hours looking at the blue screen hoping that my application will show up there.
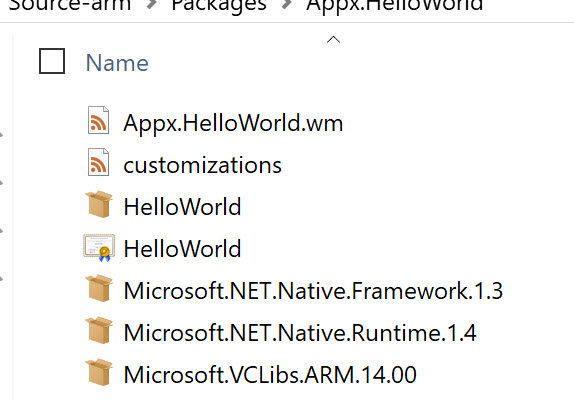
The above command will create a new folder in your workspace, in our case it is at C:\OEE\Source-arm\Packages\Appx.HelloWorld. It will also copy the appx files and its dependencies from the folder we are specifying in the command and generates a customizations.xml file as well as a package xml file that is used to build the package.
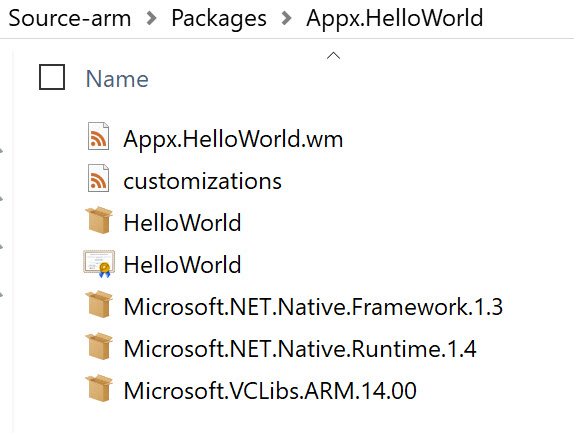
newappxpkg output
This will also create a new entry as follows in the OEMFM.xml file.
<PackageFile Path="%PKGBLD_DIR%" Name="%OEM_NAME%.Appx.HelloWorld.cab">
        <FeatureIDs>
          <FeatureID>APPX_HELLOWORLD</FeatureID>
        </FeatureIDs>
      </PackageFile>
Now let’s just build our package.
PS C:\OEE>buildpkg Appx.HelloWorld
Processing Appx.HelloWorld.wm.xml
True
IoTCorePShell arm 10.0.0.0 Test
Now you should be able to see your package.cab file in the build directory C:\OEE\Build\arm\pkgs. Let’s add the feature APPX_HELLOWORLD to our product OEEIoTCore now.
PS C:\OEE>addfid OEEIoTCore Test APPX_HELLOWORLD -OEM
IoTCorePShell arm 10.0.0.0 Test
You can also remove any feature from any product by using “removefid” command. As we have added our feature, now it is time to build our image.
PS C:\OEE>buildimage OEEIoTCore Test
Please be noted that this may take some time, and once it is done, you will be getting an output as below.
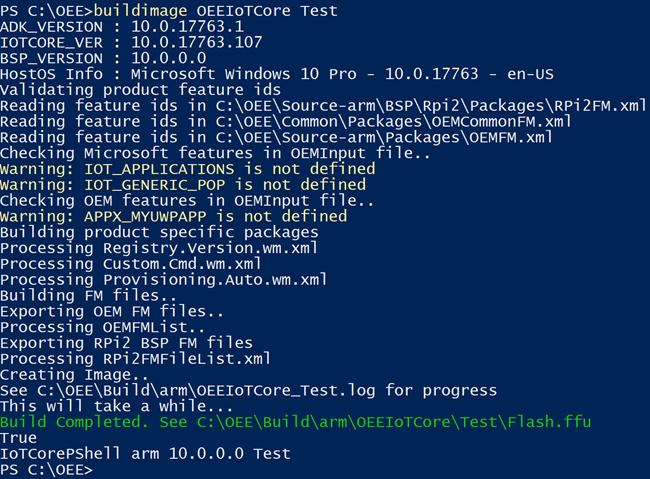
buildimage
The new image will be available in your build folder (C:\OEE\Build\arm\OEEIoTCore\Test). Now you can write this FFU image with your application as mentioned in my previous article.
Now that our OS is flashed and it is time to connect the SD card to the Raspberry Pi. Once that is done, you can see that your application is running in your device portal.
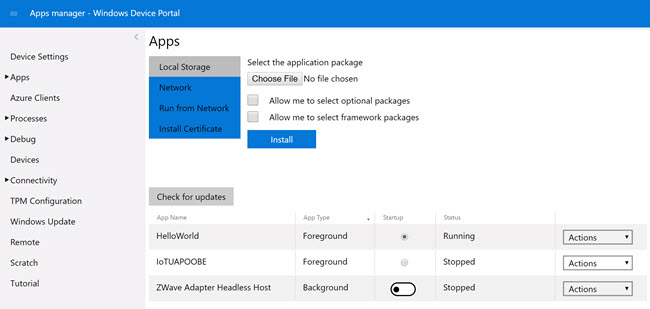
Custom Package in Device Portal
Now let’s add a background application and follow the same procedure.
PS C:\OEE>newappxpkg "C:\Users\SibeeshVenu\SourceCode\OEE\ml.OEE.Pi.Windows\ml.OEE.Pi.Windows.BeaconDetector\AppPackages\ml.OEE.Pi.Windows.BeaconDetector_1.0.3.0_ARM_Test\ml.OEE.Pi.Windows.BeaconDetector_1.0.3.0_ARM.appx" bgt Appx.Beacon
I am sure you will be able to see your background application in your device portal, once you had followed the steps correctly.
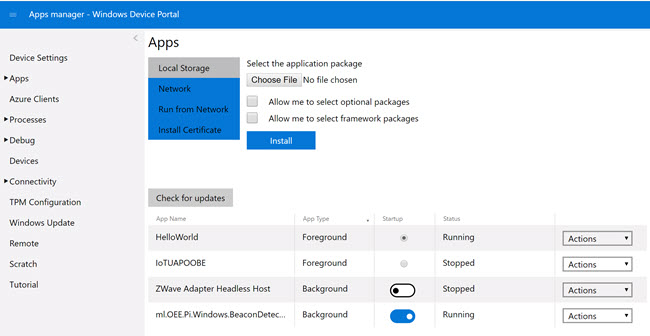
Background Application in IoT Device Portal
Conclusion
Wow!. Now we have learned,
- how we can generate APPX package of our UWP application
- how to add the new feature to the existing IoT Core FFU image
- how to write the same to an SD card
- how to manage the new application in Device Portal
Your turn. What do you think?
Thanks a lot for reading. Did I miss anything that you may think which is needed in this article? Could you find this post as useful? Kindly do not forget to share me your feedback.
Kindest Regards
Sibeesh Venu